

What is OpenClaw & Why It’s Blowing Up Right Now 🦞
If you’ve spent any time on X lately, you’ve probably seen the lobster emoji floating around 🦞, followed by someone casually saying something like:
“I haven’t checked my email in three weeks and my business is somehow running fine.”
Yeah… that’s OpenClaw doing its thing.
At first, I thought it was just another overhyped AI trend. You know the type: cool demo, zero real-world impact. But the more I looked into it, the more I realized it was actually solving problems I deal with every day; spending over half the week drowning in “inbox noise,” manually triaging tons of emails and resumes just to find the few that actually matter; being trapped in a cycle of back-to-back meetings simply to extract status updates that could have been summarized into a single-page briefing.
So naturally, when you hear “AI agents that automate all of this,” you get curious… and then immediately suspicious. Where does my company data actually go? Is this going to quietly burn through a budget I never approved? What happens if an agent messes up a task?
As a CEO of a tech company, I’ve learned this the hard way:
If you want to build a real AI assistant system that works for your business, you can’t outsource the thinking.
So I did exactly that. I went deep. Installed OpenClaw from scratch. Broke things. Fixed them. Rebuilt it properly. And eventually designed a multi-agent system that actually works, securely and efficiently, in real business workflows.
It’s an open-source, self-hosted AI operating system that connects directly to the tools you already use, WhatsApp, Telegram, Slack, Discord, and lets you command a team of autonomous agents right from your chat window.
We’re talking about agents that can:
- Read and triage your emails
- Schedule meetings
- Run scripts
- Manage files
- Delegate tasks to other agents
- And quietly work in the background while you focus on decisions that actually matter
Not theory. Not demos. Actual execution.
It was created by Austrian developer Peter Steinberger in November 2025 (originally named Clawdbot, briefly Moltbot, long story involving some trademark drama with Anthropic 😅), and it has since exploded to over 247,000 GitHub stars in just a few months, making it one of the fastest-growing open-source projects ever.
So in this guide, I’m going to walk you through exactly how I set it up, the secure way, the scalable way.
Why Cloud + Docker + EC2 (Not Just Your MacBook)
You can run OpenClaw locally. Most people start that way. But for business use, you need something sturdier.
- Always on. Your laptop sleeps. EC2 doesn’t. Your agents need to be awake to catch that midnight email from a candidate in a different timezone.
- Isolated environment. You do NOT want an agent with email and file access running next to your personal and/or company banking details.
- Easy updates. Docker lets you update OpenClaw by pulling a new image and restarting. Done in 60 seconds.
- Disaster recovery. AWS snapshots beat “I spilled coffee on my laptop” every time.
- Scalable. One agent today. A whole team of specialized agents tomorrow.
Tailscale is the secret weapon here. Instead of exposing your OpenClaw dashboard to the public internet (please don’t), Tailscale creates a private WireGuard-encrypted mesh network. Your dashboard is accessible from your laptop or phone, but completely invisible to the rest of the internet.
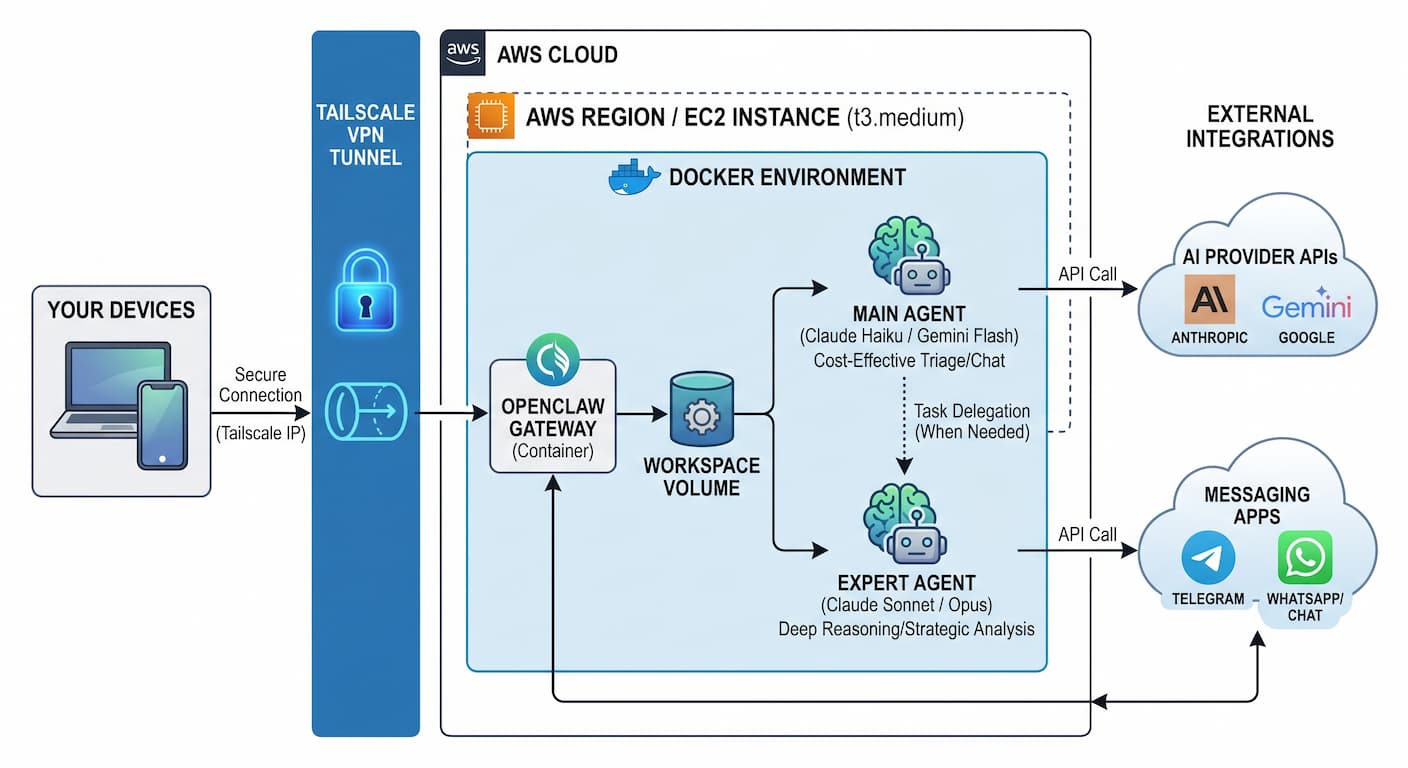
The OpenClaw dashboard should never be on a public IP without authentication. The whole point of this guide is to route it exclusively through Tailscale’s private network. If someone else can reach your OpenClaw UI, they can command your agent, including your email and calendar. Tailscale makes this a non-issue.
Spinning Up Your EC2 Instance on AWS
Log into console.aws.amazon.com, search for “EC2,” and click Launch Instance. Follow these steps:
Name your instance openclaw-server. Choose Ubuntu Server 24.04 LTS (HVM) as the OS image, free-tier eligible and well-supported.
Choose t3.medium (2 vCPU, 4 GB RAM) for a single-user setup. If you’re planning 5+ agents, go t3.large (8 GB RAM). Skip t2, t3 is faster and cheaper for the same specs.
Click Create new key pair, name it demo-key, choose RSA + .pem. Download and store this file somewhere extremely safe. Lose it and you’re permanently locked out. No recovery option.
Create a new security group. Allow only SSH (port 22) from your IP. Block everything else. Tailscale will handle all other access securely, no need to open any other ports in AWS.
Set root volume to at least 30 GB gp3. Docker images + agent workspace + conversation history add up. gp3 is cheaper and faster than gp2.
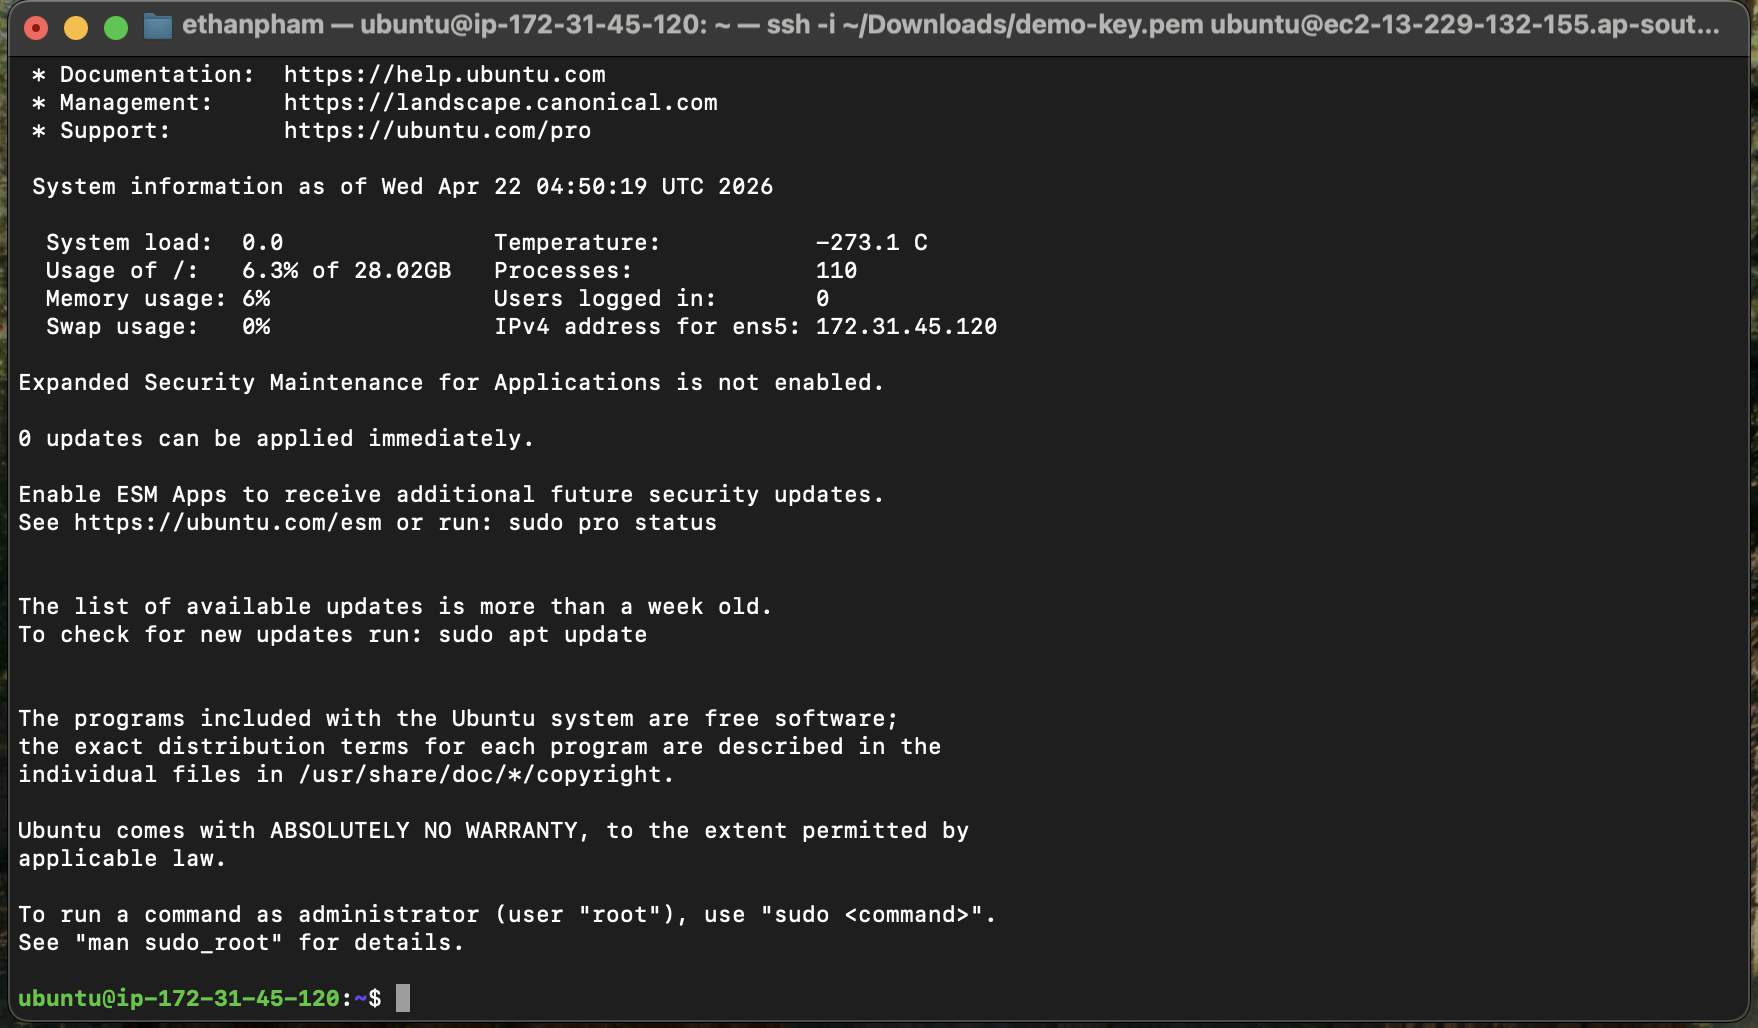
Click Launch Instance. Wait until status shows “Running,” then click on the Instance ID > Connect > SSH Client > grab the example SSH command at the bottom of the page and run it in your terminal.
# Fix permissions on your downloaded key file
chmod 400 ~/Downloads/demo-key.pem

# Connect (replace with your actual EC2 public IP)
ssh -i "~/Downloads/demo-key.pem" ubuntu@<YOUR_EC2_PUBLIC_IP>.ap-southeast-1.compute.amazonaws.com
If you have followed the steps right, you should see a terminal screen of the successul SSH to your EC2 instance as follows:
When setting up the security group, set SSH source to “My IP”, not 0.0.0.0/0. A server with port 22 open to the world will receive automated brute-force attempts within minutes of launch. We’re also hardening SSH further in the next section with key-only login, so this combined approach makes your server extremely resistant to unauthorized access.
Server Hardening & Docker Setup 🛠️
You’re in. Now let’s lock this server down before putting any AI agents on it. Run each group of commands in order. Each one is annotated, please read them, don’t just paste blindly.
When you edit the SSH config and restart the service, test access from a second terminal window before closing your current session. If something goes wrong, you’ll still be connected and can fix it. Closing too early = locked out with no way back in.
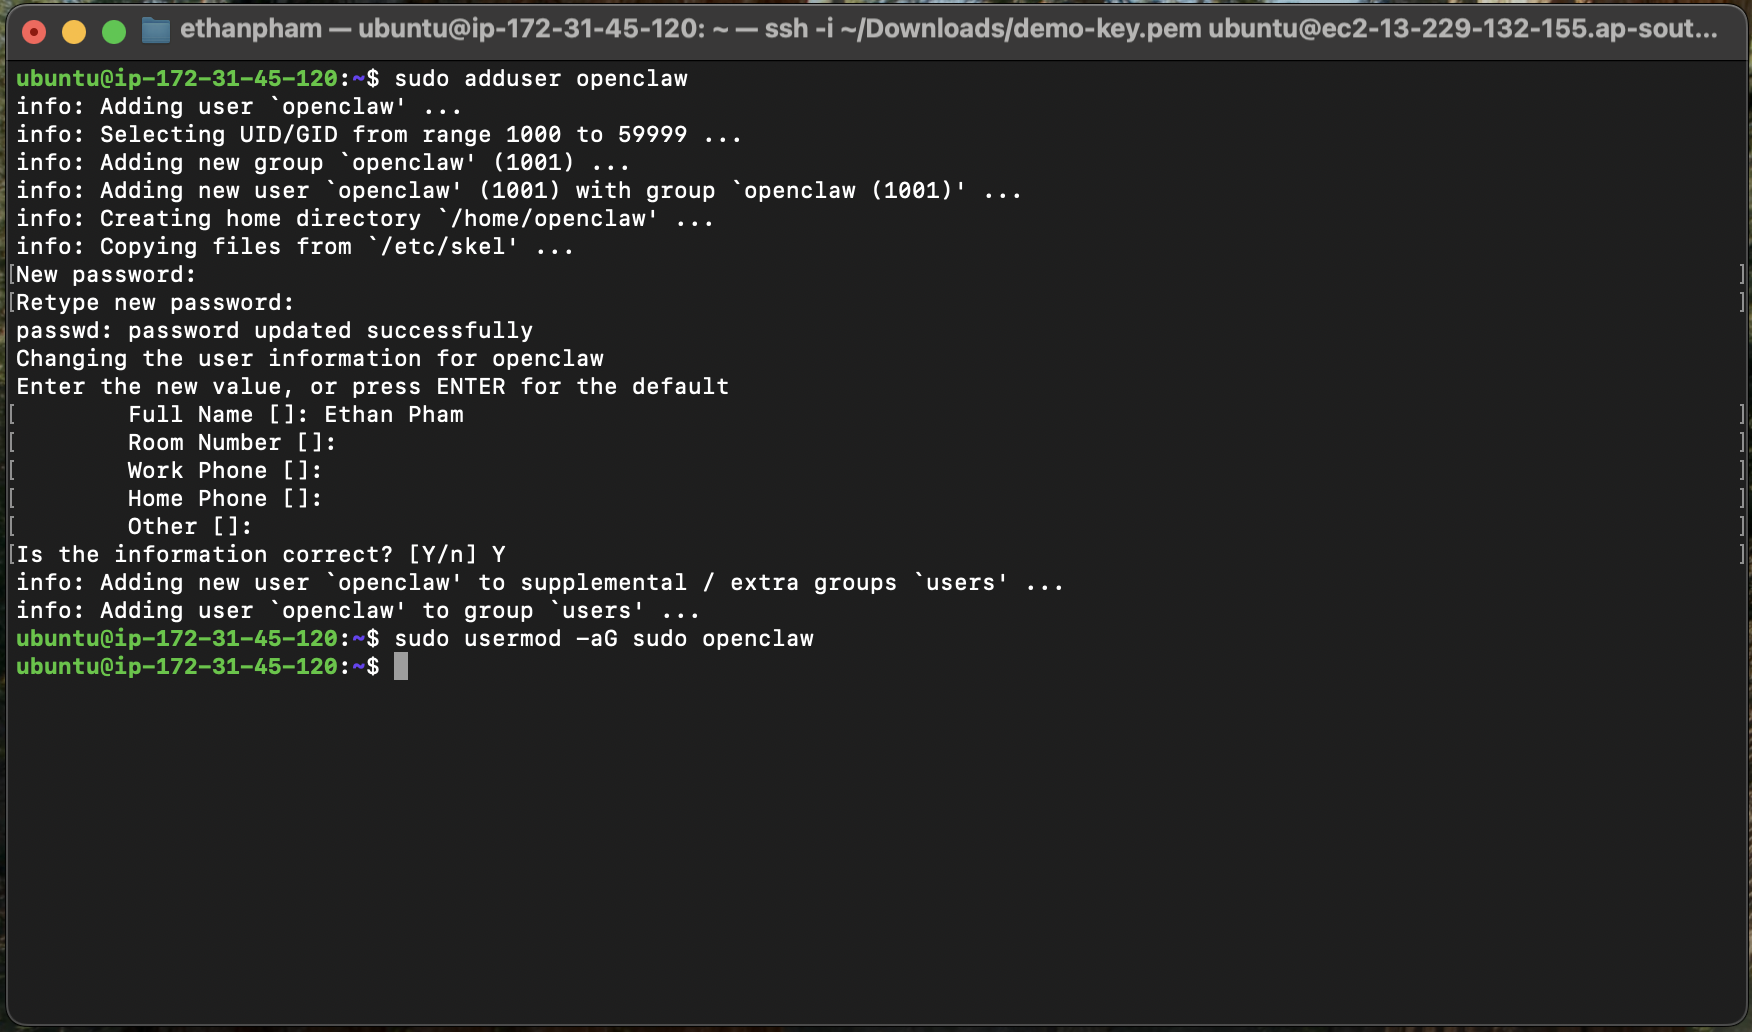
System Update & Dedicated User
sudo apt update && sudo apt upgrade -y
sudo adduser openclaw
sudo usermod -aG sudo openclaw
You should see the terminal screen as follows:
SSH Key Transfer & Permissions
sudo mkdir -p /home/openclaw/.ssh
sudo cp /home/ubuntu/.ssh/authorized_keys /home/openclaw/.ssh/
sudo chown -R openclaw:openclaw /home/openclaw/.ssh
sudo chmod 700 /home/openclaw/.ssh
sudo chmod 600 /home/openclaw/.ssh/authorized_keys
Firewall (UFW)
sudo ufw default deny incoming
sudo ufw default allow outgoing
sudo ufw allow 22/tcp
sudo ufw enable
Openclaw User Switch
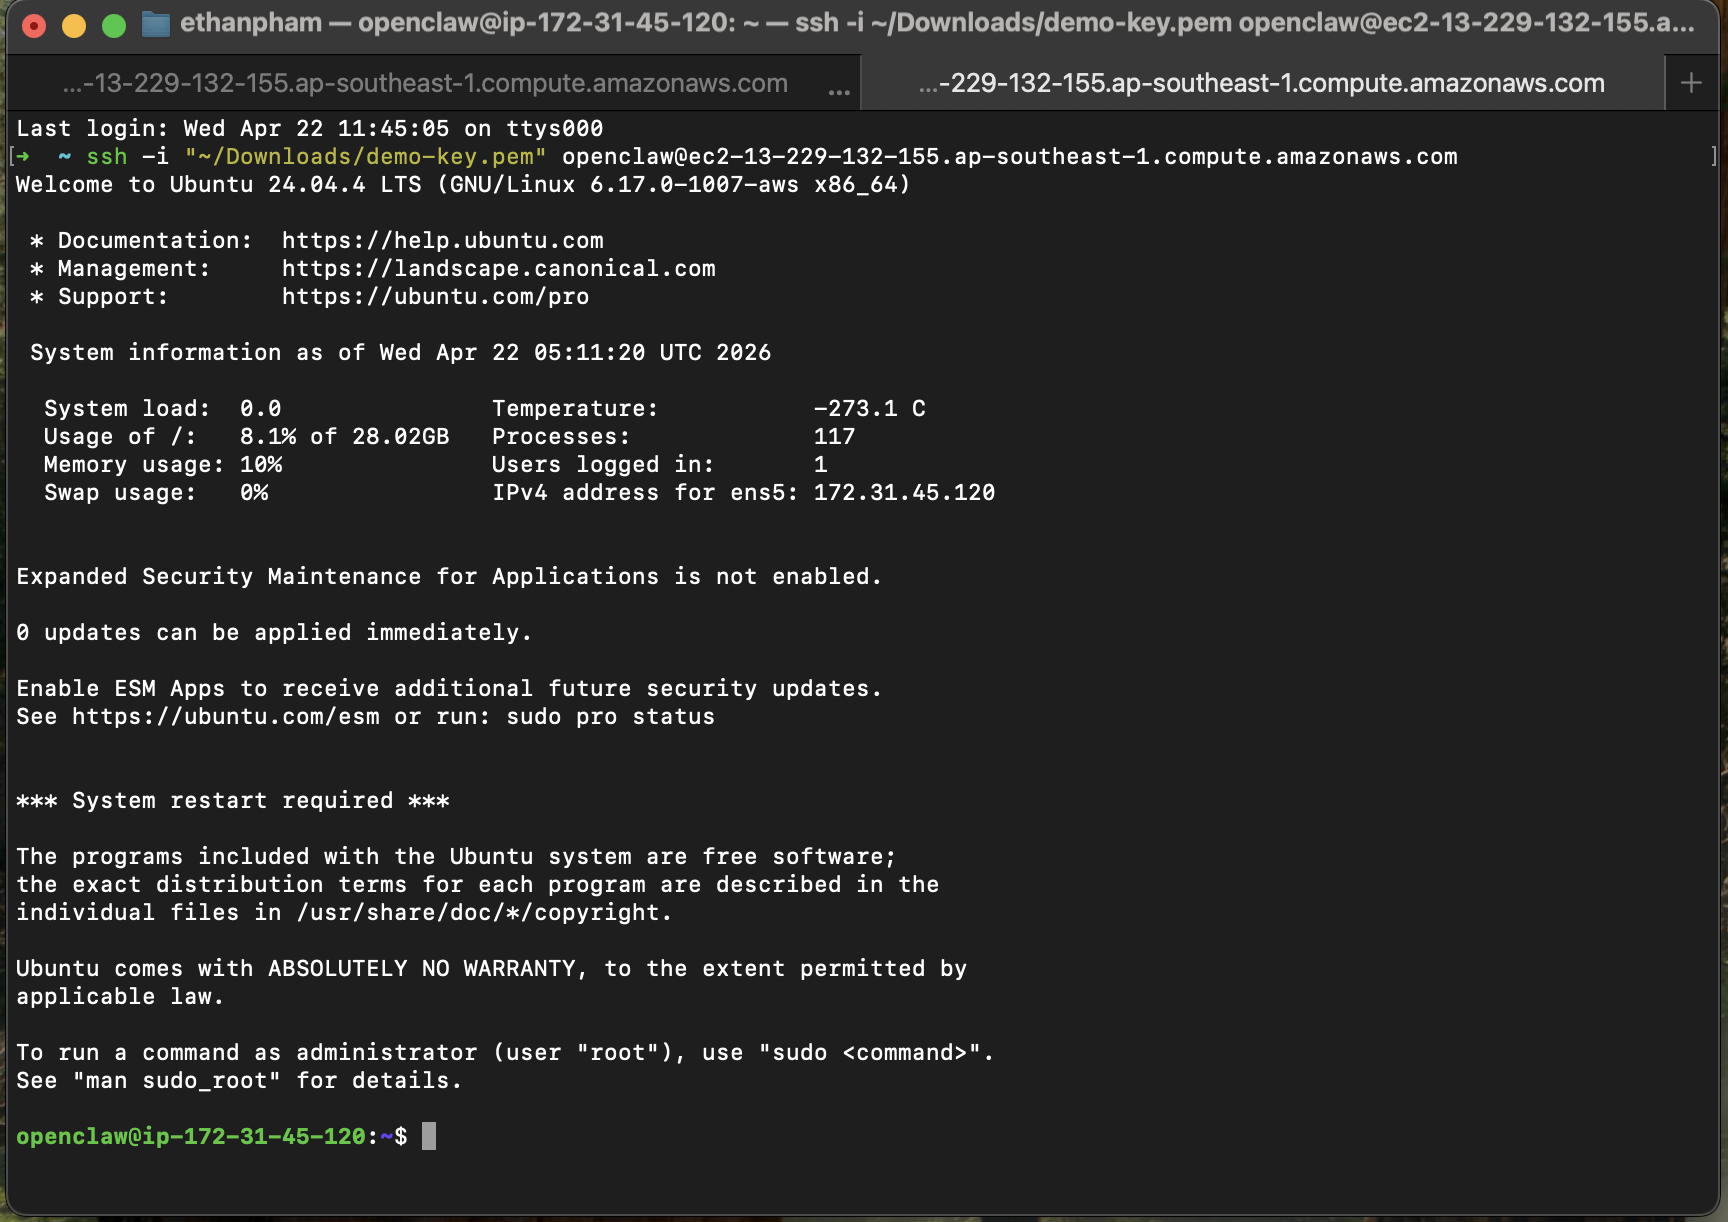
Open a new tab in your Terminal. Then go back to your EC2 instance page, click Instance ID → Connect → SSH Client, and copy the example SSH command shown at the bottom. This time, simply replace ubuntu with your new openclaw user before running the command.
ssh -i "~/Downloads/demo-key.pem" openclaw@<YOUR_EC2_PUBLIC_IP>.ap-southeast-1.compute.amazonaws.com
You should now see a terminal screen similar to this, with the prompt showing openclaw@ip-... highlighted in green, indicating that you’re successfully logged in as the new openclaw user.
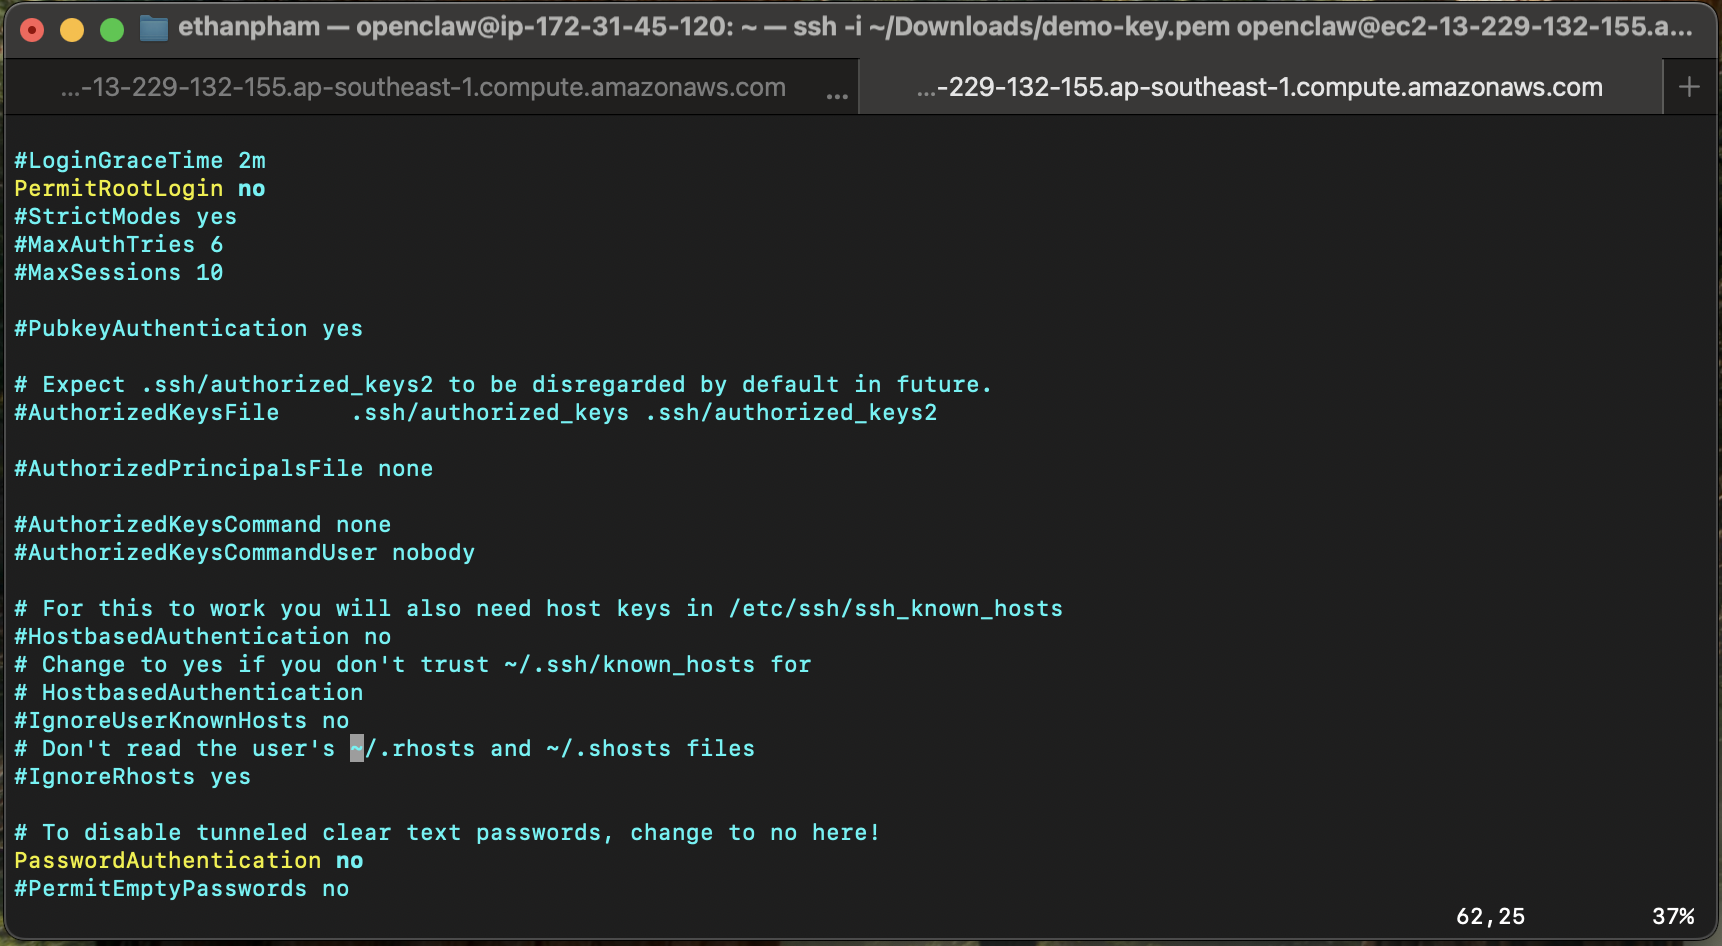
Harden SSH Config
sudo vi /etc/ssh/sshd_config
If you’re not familiar with this editor (it’s vi, and yes… it’s a bit old-school 😅), just follow these exact steps:
-
Type
/PasswordAuthenticationand press Enter. Then pressito enter edit mode, remove the#to uncomment the line, and change the value tono. Once done, press Esc. -
Next, type
/PermitRootLoginand press Enter. Again, pressi, remove the#, and set the value tono. Press Esc when finished. -
Finally, type
:wqand hit Enter to save your changes and exit the editor.
You should see the terminal screen before exiting, as follows:
sudo systemctl stop ssh.socket
sudo systemctl disable ssh.socket
sudo systemctl restart ssh
sudo ss -tulpn | grep ssh
Install Docker
sudo apt install apt-transport-https ca-certificates curl software-properties-common -y
curl -fsSL https://download.docker.com/linux/ubuntu/gpg | sudo gpg --dearmor -o /usr/share/keyrings/docker-archive-keyring.gpg
echo "deb [arch=$(dpkg --print-architecture) signed-by=/usr/share/keyrings/docker-archive-keyring.gpg] https://download.docker.com/linux/ubuntu $(lsb_release -cs) stable" | sudo tee /etc/apt/sources.list.d/docker.list > /dev/null
sudo apt update
sudo apt install docker-ce docker-ce-cli containerd.io docker-compose-plugin -y
sudo usermod -aG docker ${USER}
exit
ssh -i "~/Downloads/demo-key.pem" openclaw@<YOUR_EC2_PUBLIC_IP>.ap-southeast-1.compute.amazonaws.com
Install Tailscale
curl -fsSL https://tailscale.com/install.sh | sh
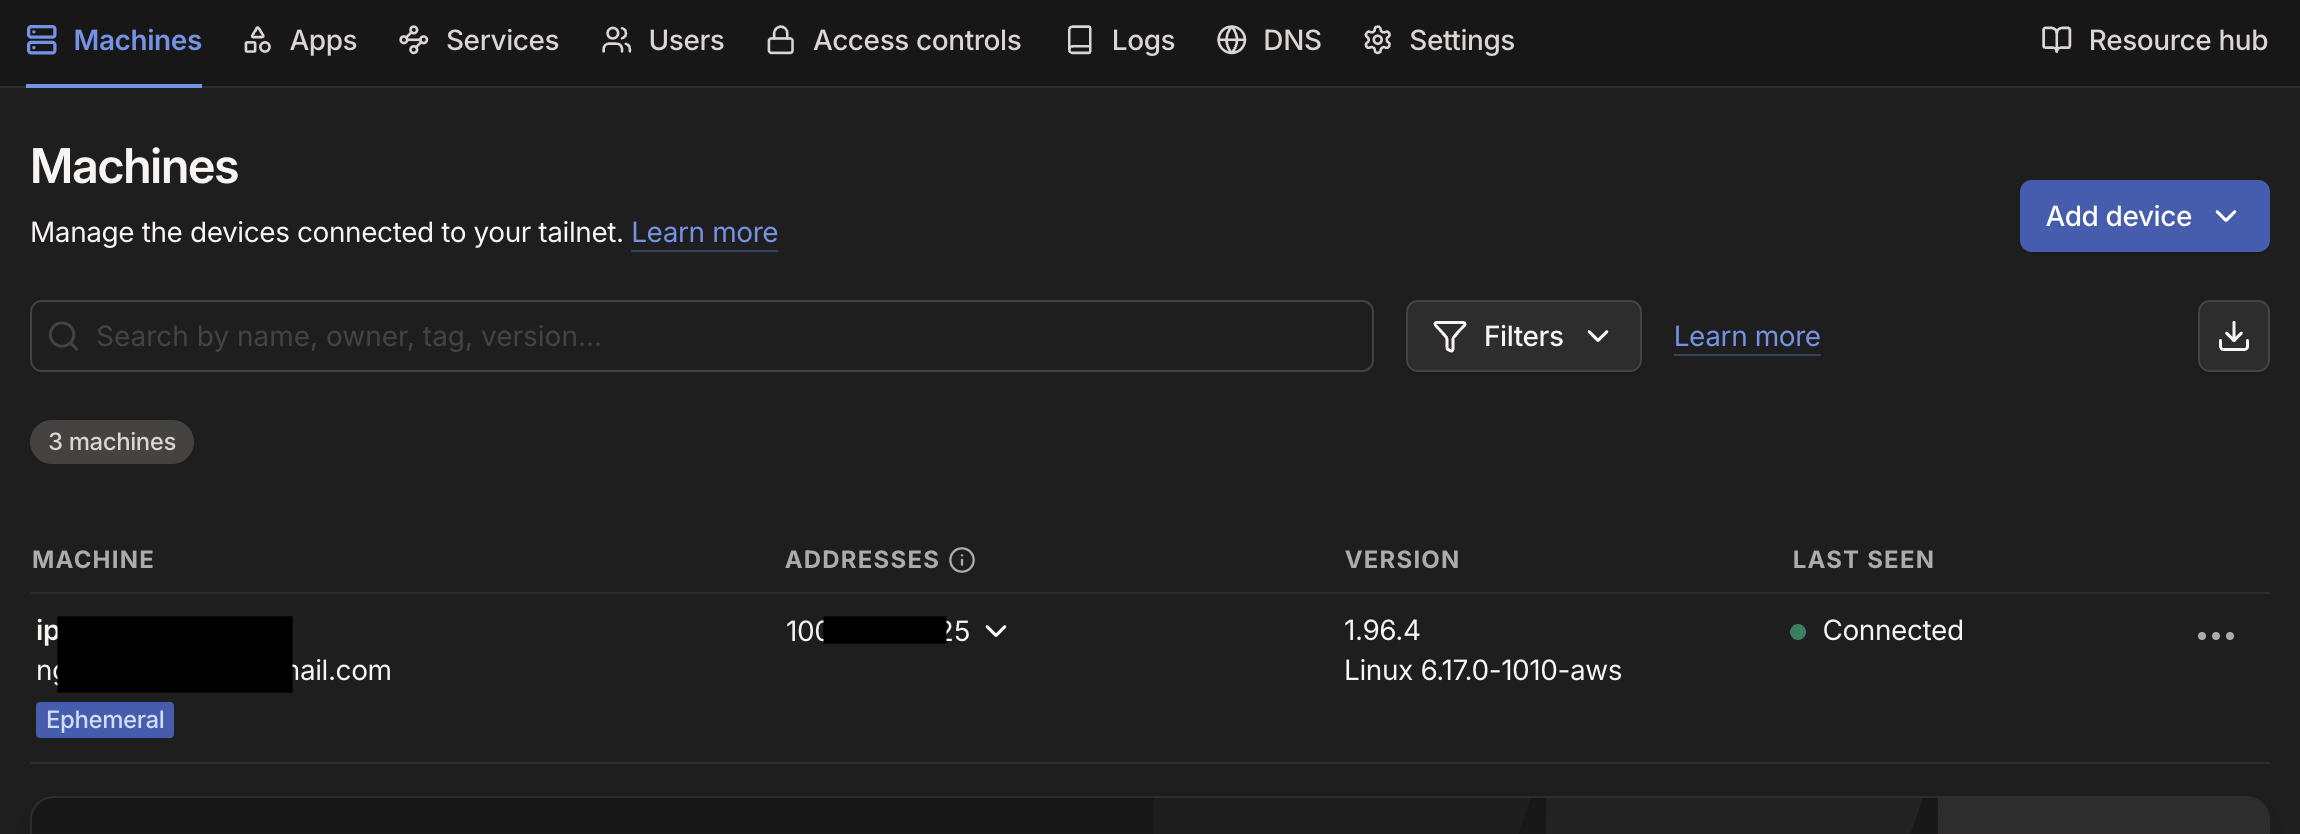
To set up Tailscale, head over to tailscale.com and create an account if you don’t already have one. Once logged in, go to “Add Device” and choose “Linux Server”. Make sure to enable the Ephemeral option. This ensures your server doesn’t stay permanently authorized if it gets rebuilt or replaced. Then click “Generate Install Script”, copy the command provided, and run it directly in your terminal on the EC2 instance. The command looks something like below.
curl -fsSL https://tailscale.com/install.sh | sh && sudo tailscale up --auth-key=tskey-auth-YOUR_KEY_HERE
Once done, you should see the Tailscale’s Dashboard with the new machine and status Connected as follows:
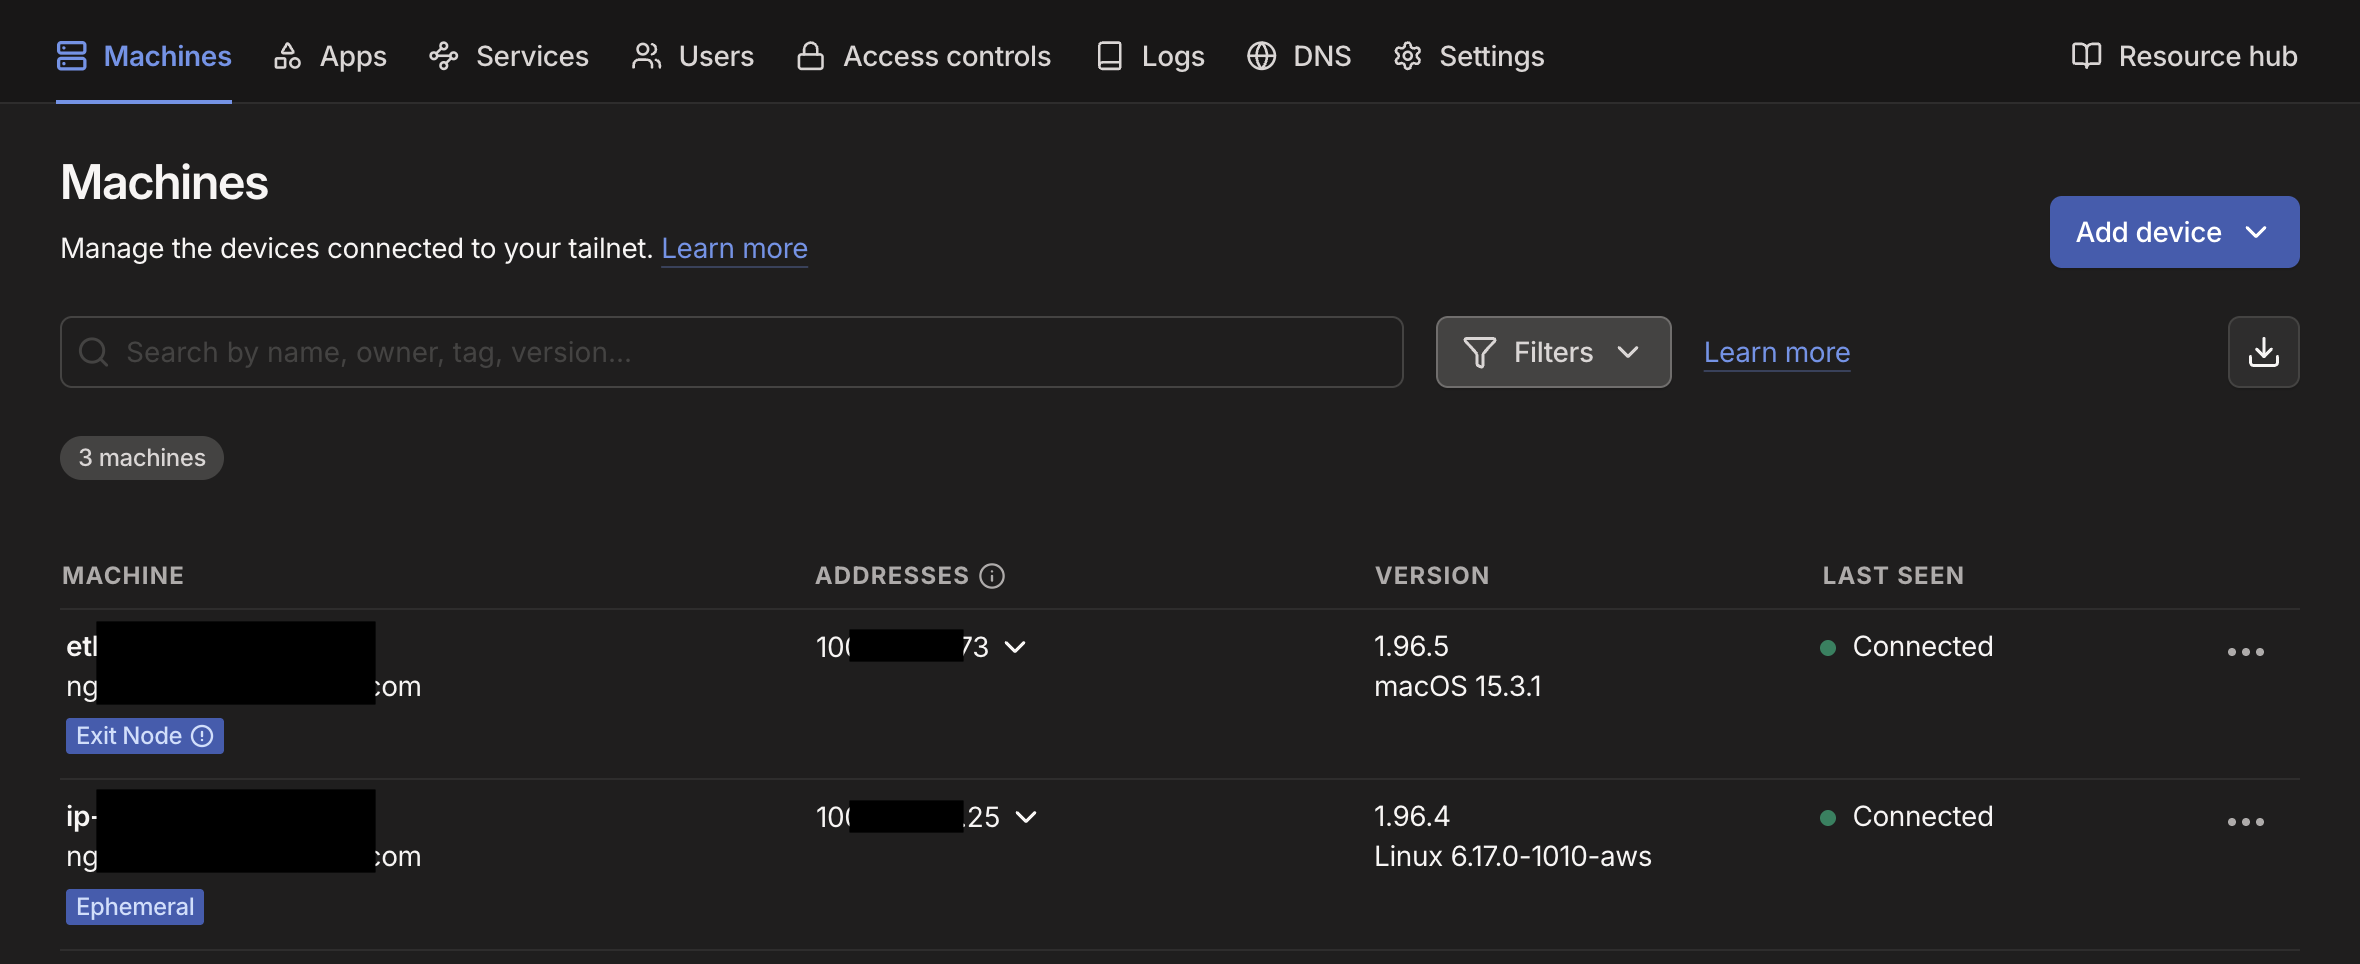
Next, you need to install Tailscale on your local machine, go to tailscale.com/download and download the version that matches your operating system. Install the app as usual. Once installed (on macOS, you’ll see a Tailscale icon in the top menu bar), click the icon and select “Connect”. You’ll be prompted to log in, just use the same account you used earlier. After connecting, click the Tailscale icon again → Settings → and make sure “Allow local network access” is enabled. That’s it. Your device is now securely connected to your private network.
You should now see two machines connected successfully in the Tailscale’s Dashboard as follows:
Installing & Onboarding OpenClaw 🦞
Clone & Prepare Directories
git clone https://github.com/openclaw/openclaw.git
cd openclaw/
mkdir -p /home/openclaw/.openclaw/workspace
sudo chmod -R 777 /home/openclaw/.openclaw
sudo chown -R openclaw:openclaw ~/openclaw
sudo chmod -R 775 ~/openclaw
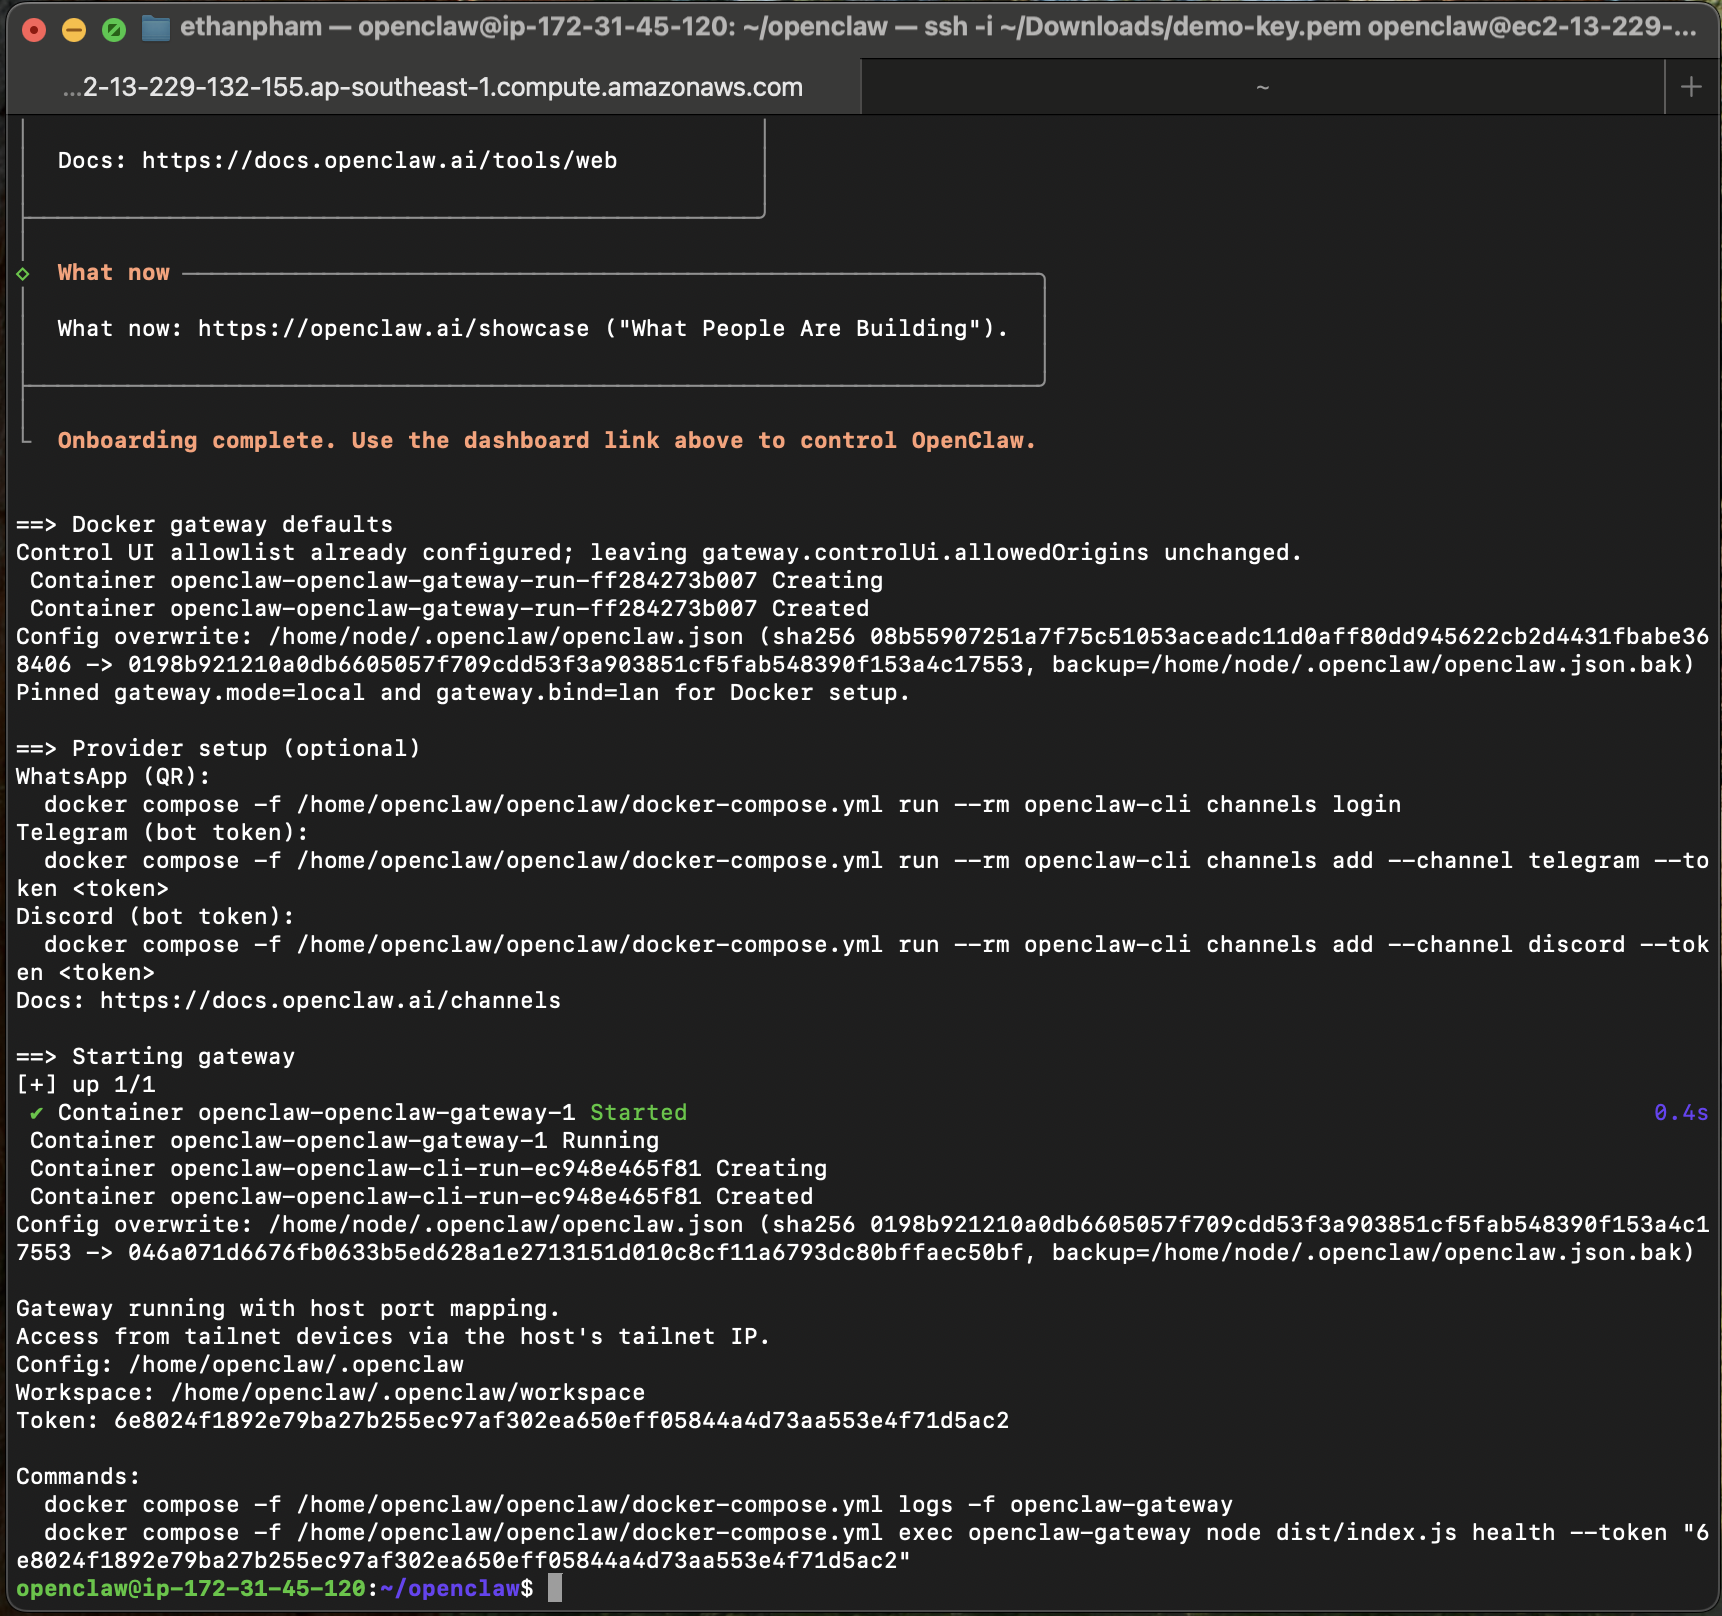
Run the Docker Setup Script
./docker-setup.sh
Welcome to the Openclaw Onboarding Wizard:
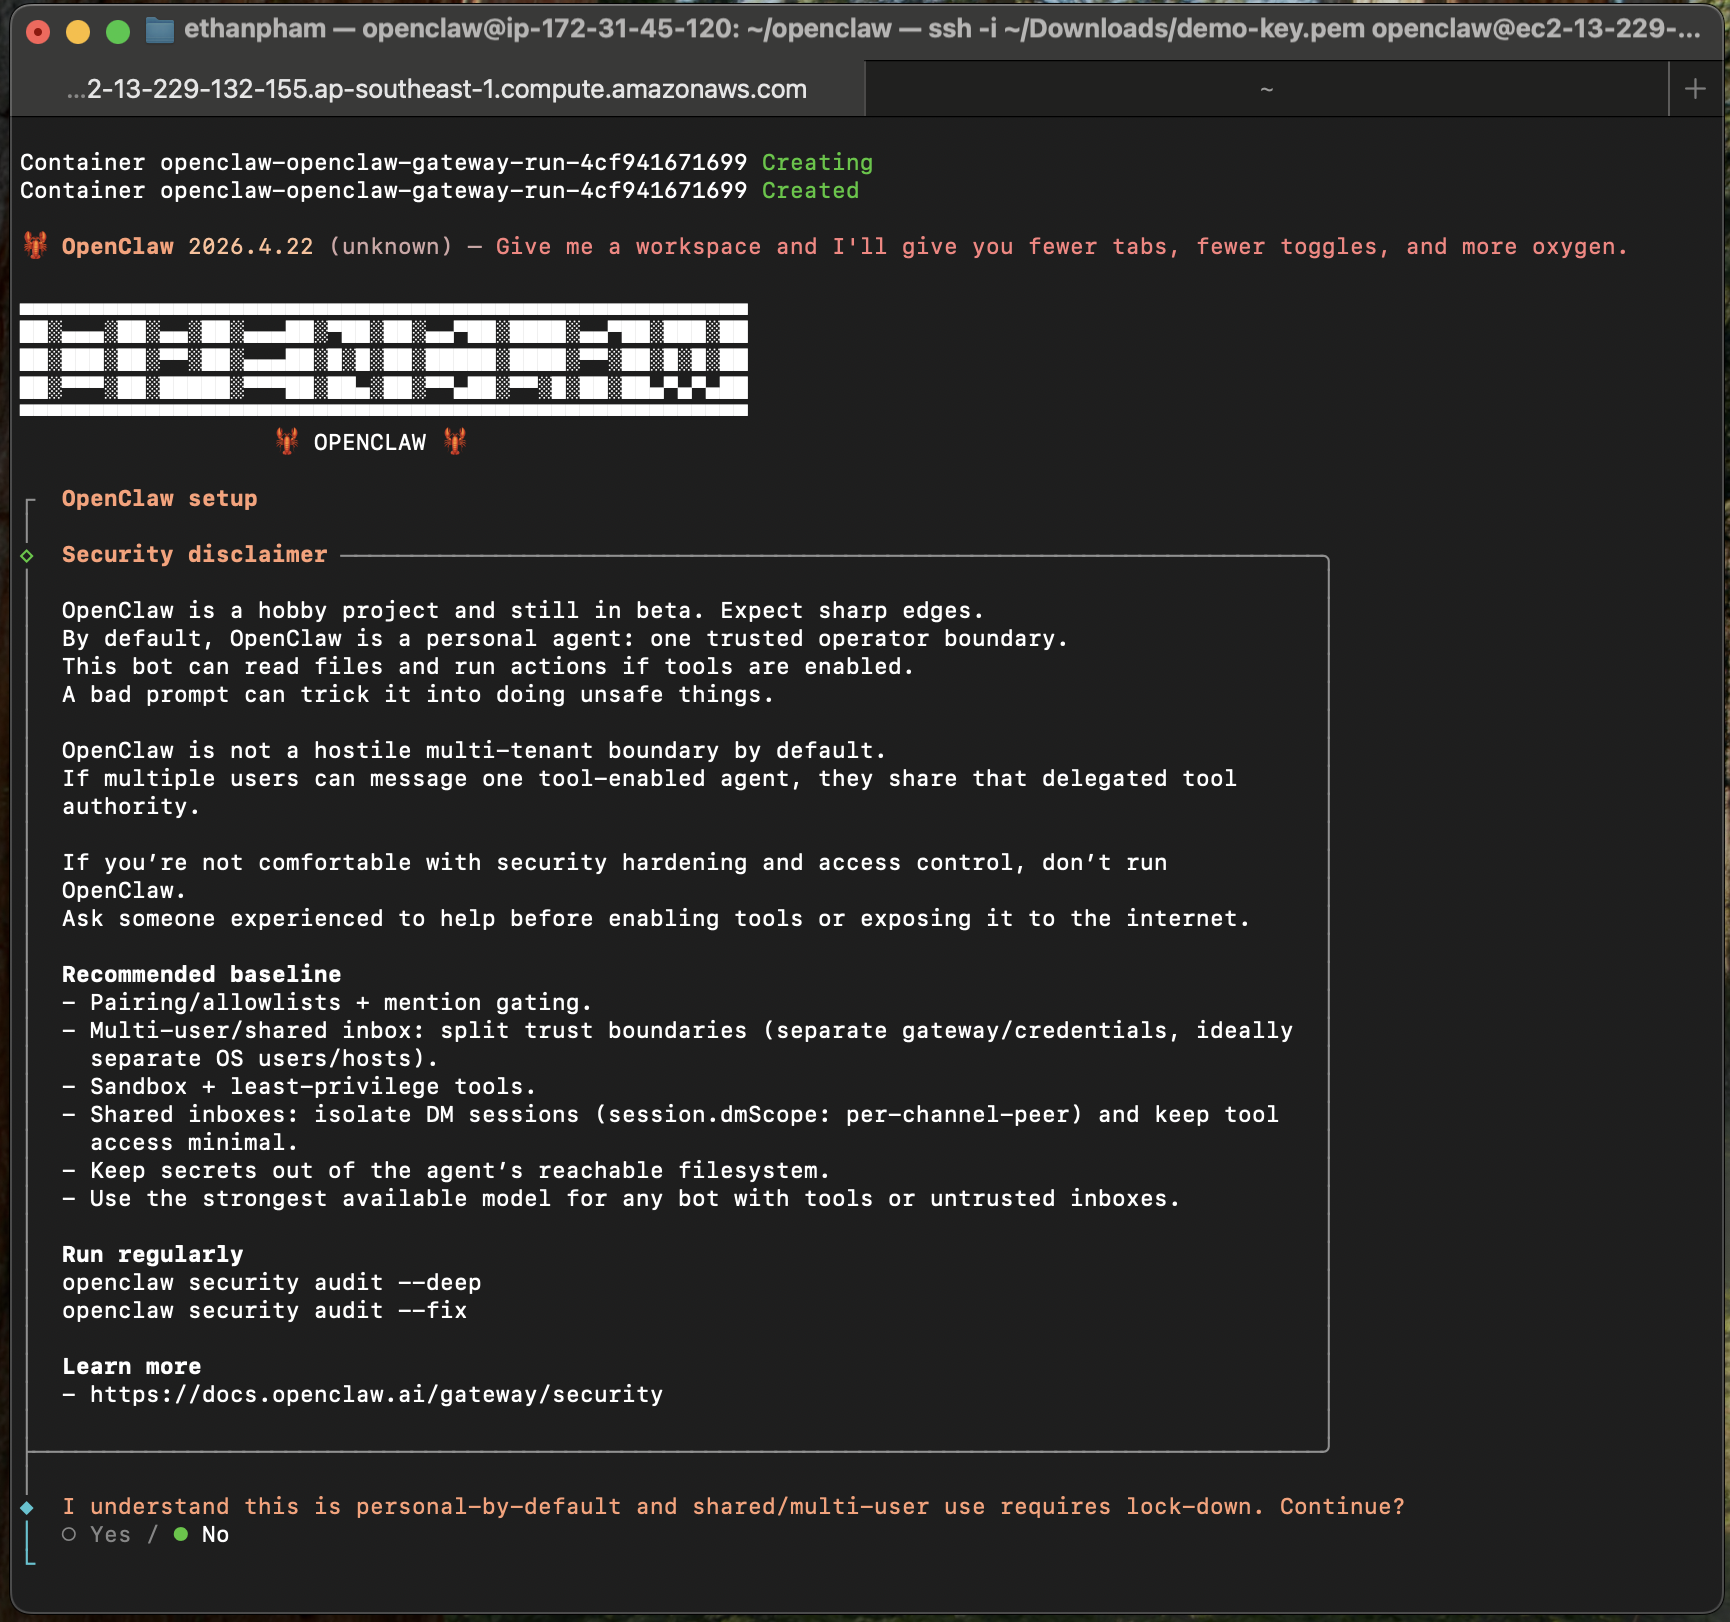
The Onboarding Wizard — Step by Step
Once containers are up, the interactive Onboarding Wizard launches in your terminal. Navigate with arrow keys, select with spacebar, confirm with Enter.
Read it. Not boilerplate. Tt’s telling you this agent will have real access to real things. Acknowledge, select Yes and continue.
Choose Manual.
Keep the default: /home/openclaw/.openclaw/workspace, the directory we created earlier. This is where all agent memory and files will live.
Choose Anthropic and select to paste in your API key.
If you don’t have a Claude API key yet, go to console.anthropic.com and sign up or log in. Once inside, navigate to the API Keys section, create a new key, and copy it. Keep it secure and don’t share it publicly.
It’s tempting to pick Claude Haiku or Gemini Flash to save money at this stage. Don’t. This will cost you far more in the long run.
Setting up multi-agent workflows, configuring skills, debugging integrations, and orchestrating delegation between agents all require strong reasoning capability. A cheap model will misinterpret your instructions, fail to configure automations correctly, and create broken setups you’ll spend hours trying to fix.
Use at minimum Claude Sonnet 4.6 for your gateway agent. Once everything is running correctly, you can introduce cheaper models for specific high-volume, low-complexity sub-tasks (we cover this in Section 6). Think of it like hiring an experienced consultant to build your system properly. You don’t send an intern, then pay the consultant double to clean up the mess.
Select anthropic/claude-sonnet-4-6.
Port: 18789 (default). Gateway bind: Tailnet (Tailscale IP). Gateway auth: Token. Tailscale exposure: Off. Gateway token: Generate/store plaintext token. Store the generated token to be used for accessing the Openclaw Chat window later.
Select Yes to configure channels, then select Telegram (Bot API) first, simplest to set up. You’ll need a Bot Token from @BotFather on Telegram. You can also use WhatsApp, just need to select and follow the instruction of the wizard.
Once done, select Finished to complete the Channels configuration step.
Choose No.
Choose No. We can configure these later.
Choose Skip for now. We can set these up later
Choose Yes. OpenClaw will restart automatically on server reboot. No manual babysitting required.
Once done, you should see a terminal screen as follows:
Post-Setup: Configure Tailscale Access
docker compose exec -u root openclaw-gateway bash -c "apt update && apt install -y jq"
docker compose exec -T openclaw-gateway bash -c 'jq ".gateway.controlUi.allowInsecureAuth = true" /home/node/.openclaw/openclaw.json > /home/node/.openclaw/tmp.json && mv /home/node/.openclaw/tmp.json /home/node/.openclaw/openclaw.json'
docker compose restart
tailscale ip -4
Open your browser (on a Tailscale-connected device) and go to http://<YOUR_TAILSCALE_IP>:18789. You should see the OpenClaw Control UI. Make sure you grab the Gateway Token created earlier and paste it in the Gateway Token field for loggin in.
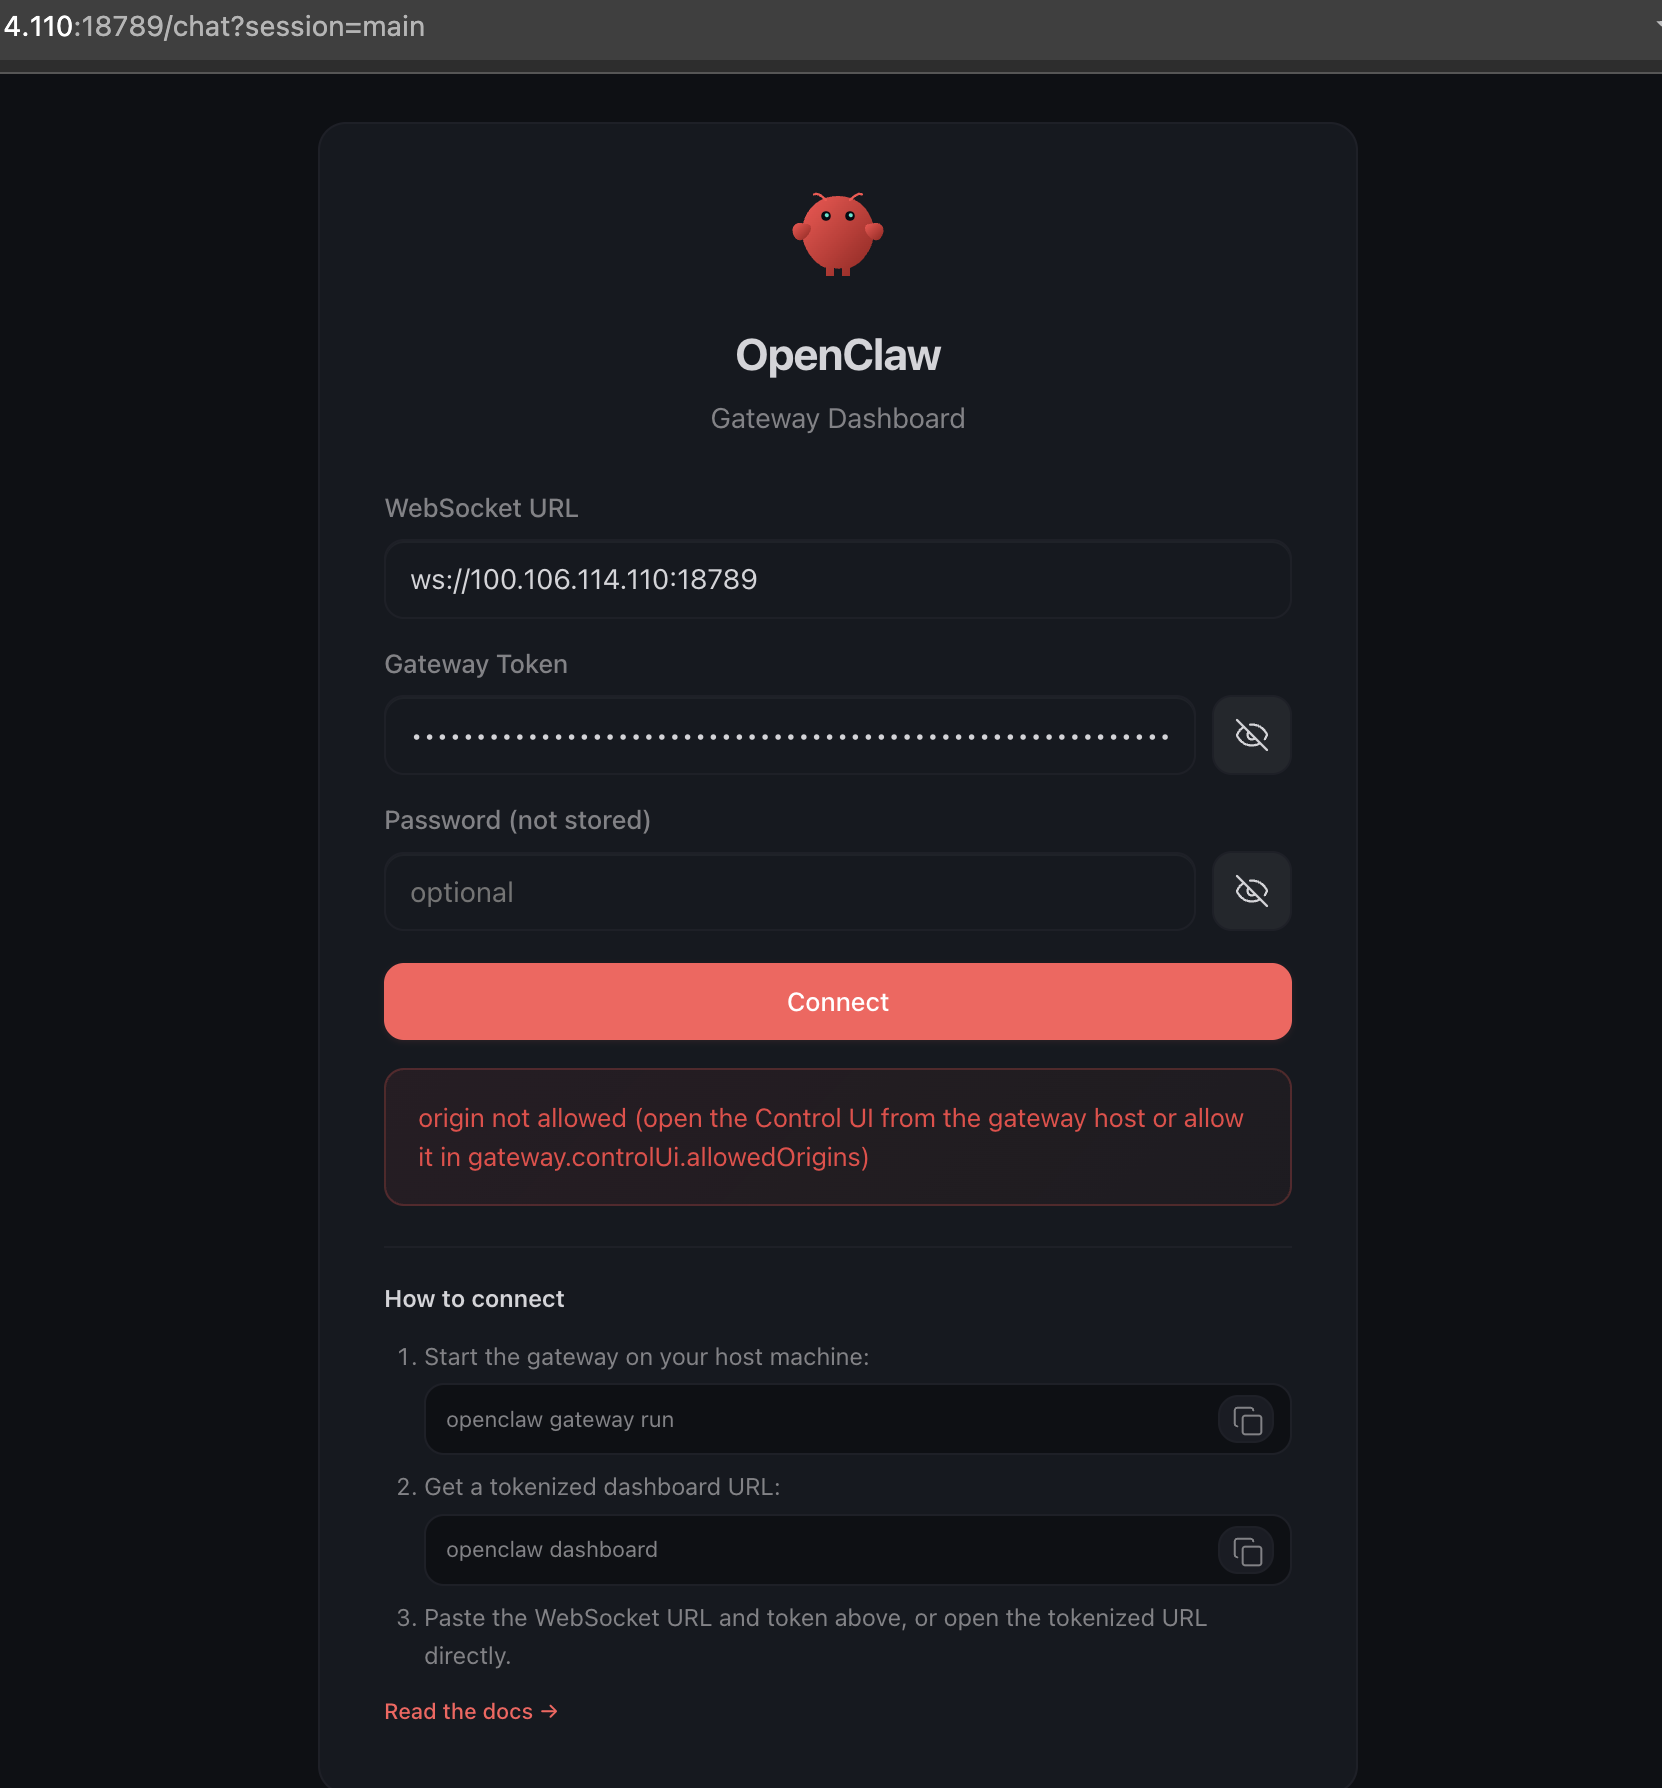
At this point, you might run into some authentication quirks depending on the OpenClaw version you’re using. In my case, I needed to apply a few extra configuration tweaks to get past the default authentication layer and access the UI smoothly. Don’t worry though. Since everything is running inside your private Tailscale network, your setup is still well protected.
docker exec -it openclaw-openclaw-gateway-1 openclaw config set gateway.controlUi.dangerouslyDisableDeviceAuth true --strict-json
docker exec -it openclaw-openclaw-gateway-1 openclaw config set gateway.controlUi.allowInsecureAuth true --strict-json
docker exec -it openclaw-openclaw-gateway-1 openclaw config set gateway.controlUi.allowedOrigins '["http://<YOUR_TAILSCALE_IP>:18789"]' --strict-json
docker compose restart
Head back to the UI… and boom 🎉 — your OpenClaw Agent is now live! Go ahead, say “Hi”, and watch your AI assistant come to life.
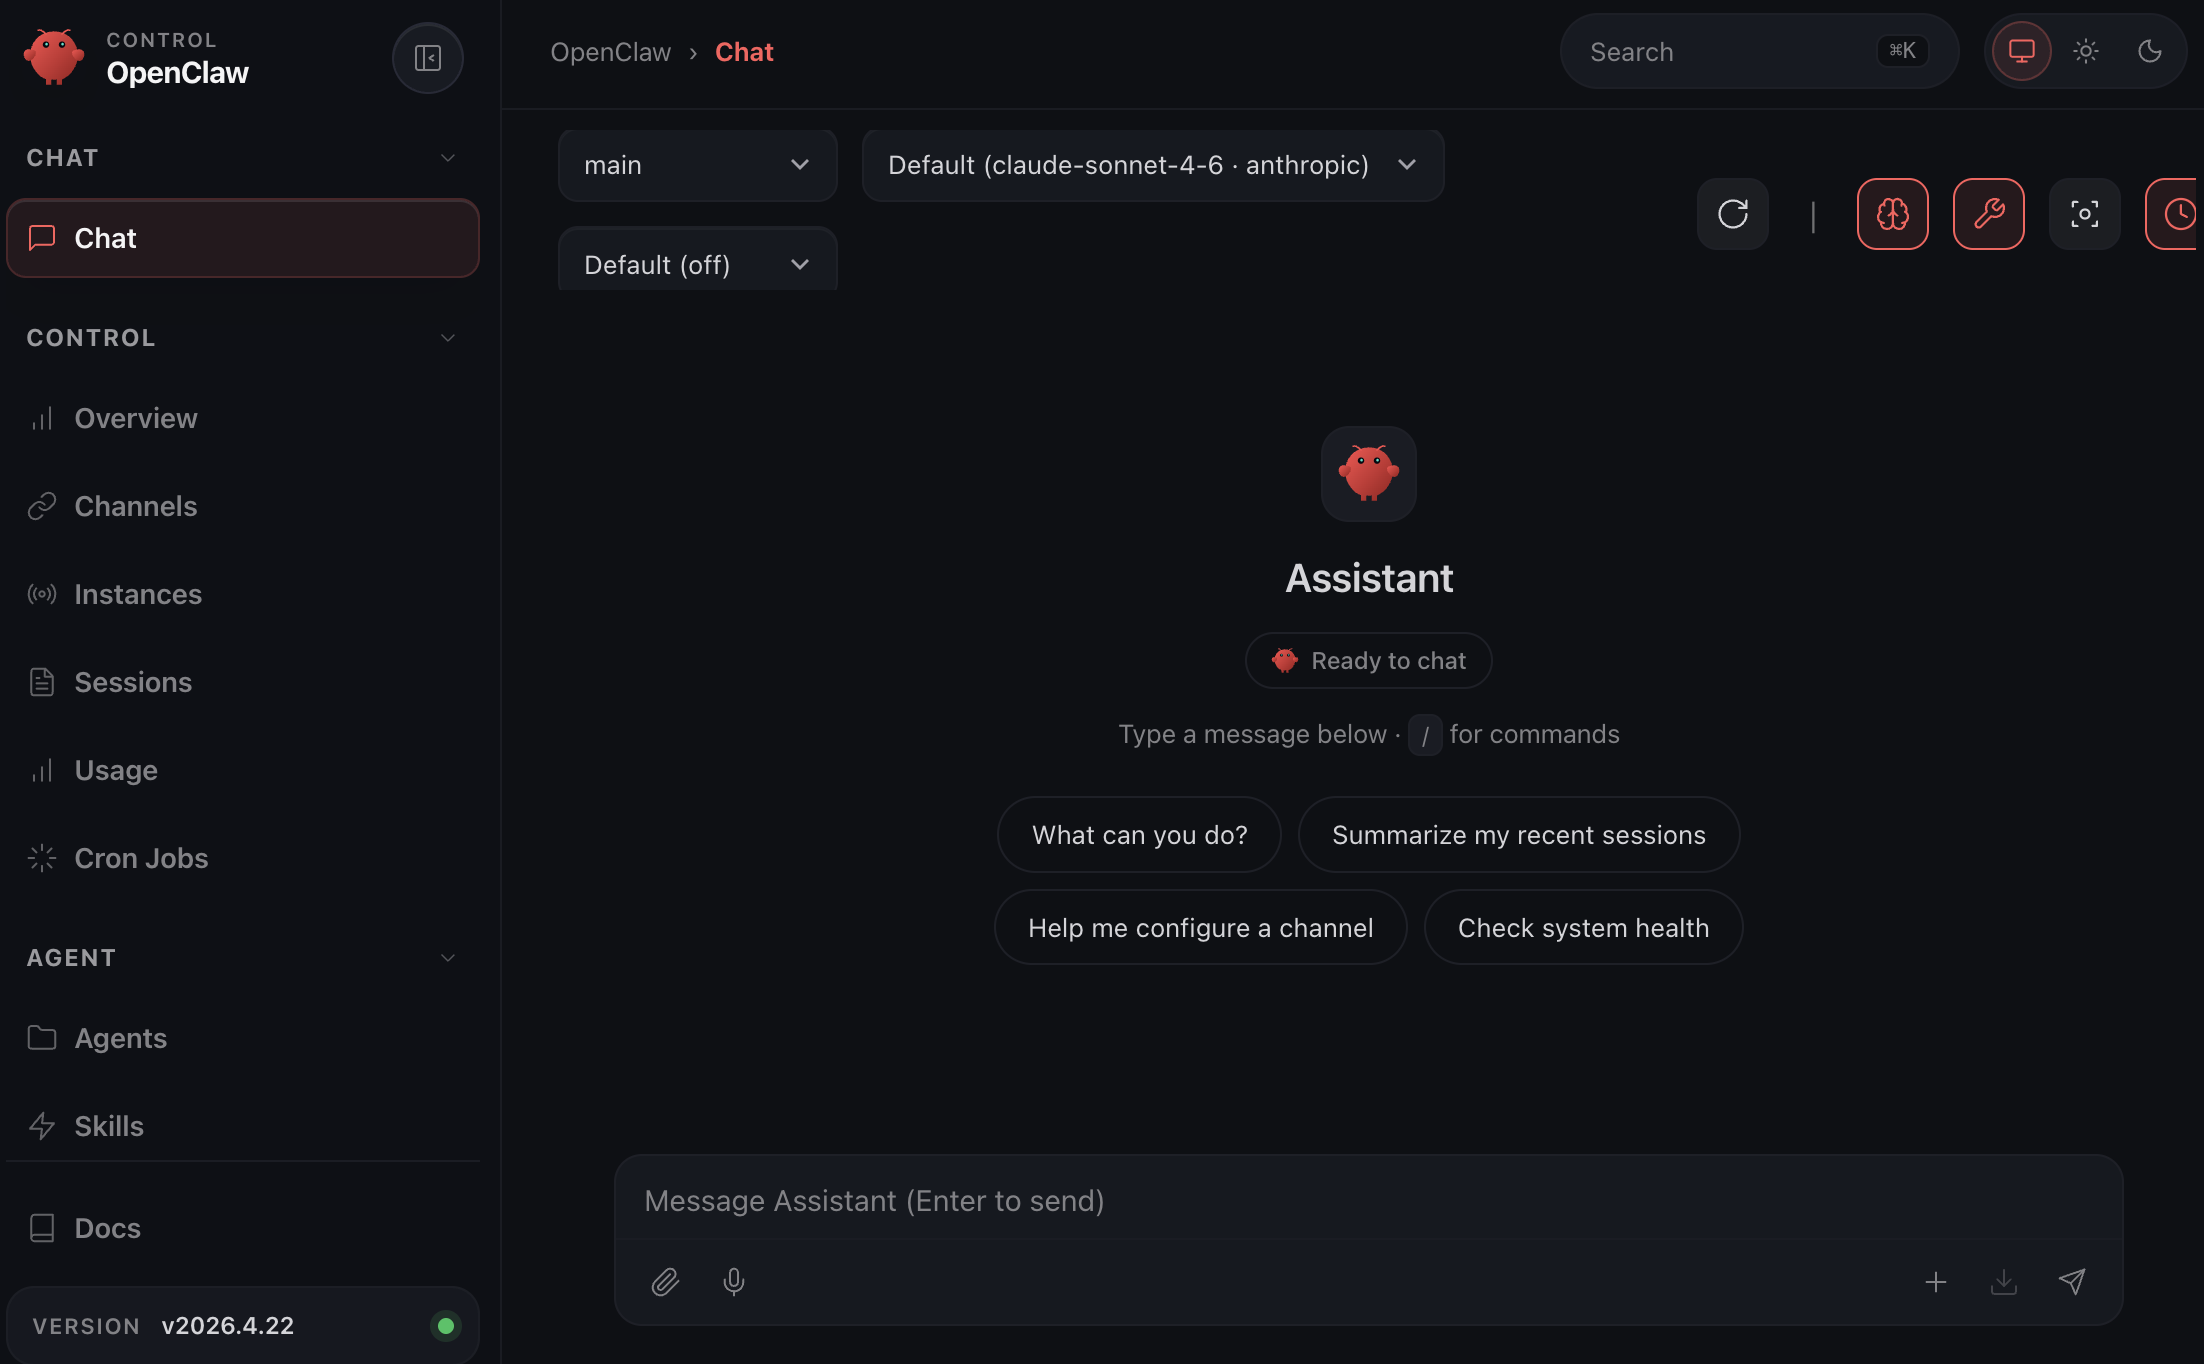
When you first start using OpenClaw, don’t treat it like a chatbot. Treat it like a new team member. Define its role, give it context about your business, and assign real tasks right away instead of asking what it can do. The beauty of OpenClaw is that it not only executes tasks but also teaches you how they’re done, helping you refine your workflows over time. Keep things simple, stay mindful of cost, and focus on building workflows, not just one-off prompts.
Designing Your Multi-Agent System: Work Smart, Spend Less 💰
Here’s the mistake most people make: spin up one agent, give it the most powerful (and expensive) model, and use it for everything. Then wonder why their API bill looks like a catering invoice for a 200-person wedding.
Not every task needs a genius. Scanning 50 emails to check if any are from job applicants is simple pattern-matching, give it to a fast, cheap model. Deep-analyzing a candidate’s CV against your company culture and role requirements? That is when you call in the heavy hitter.
The Two-Tier Agent Architecture
Here’s why this matters in dollars. A single agent on Claude Opus reading 200 emails/day at ~2,000 tokens each = 400,000 tokens/day = ~$12/day = ~$360/month. Just. For. Reading. Emails.
With a Haiku main agent doing the first-pass scan: same volume costs under $15/month. The Expert agent gets called ~20 times/day for actual analysis = ~$5/month. Total: ~$20/month vs $360/month. The math is the math.
So here is my first chat to the agent: “My name is Ethan. I am the founder and CEO of XNOR Group. You are my Assistant to help me on my everyday work. You only do simple tasks such as checking emails, calendar, setting up meetings, reading files, etc. Also you can set up and run cronjobs to do those simple tasks also. Do not execute any heavy tasks that require deep thinking. Instead, you should delegate to another agent to run asynchronously.”
Once your main agent is set up, add a dedicated expert agent:
docker compose exec -u root openclaw-gateway bash
cd /home/node/.openclaw
openclaw agents add expert
In your Main agent’s chat, give it another instructions: “Help me tell the Expert agent that his name is Steve and he’s my Chief of Staff agent, who help me do strategic thinking and analysis jobs. For tasks requiring deep analysis, CV evaluation, or strategic judgment you must delegate to Steve.”
Connecting OpenClaw to Microsoft 365 Business
Before jumping into the use cases, we need to give OpenClaw access to your company’s Microsoft 365 environment via Azure Active Directory. The good news: it’s surprisingly straightforward. Just ask your agent to help set up access using the Microsoft Graph API, and it will guide you step by step through the entire process. Something like this:
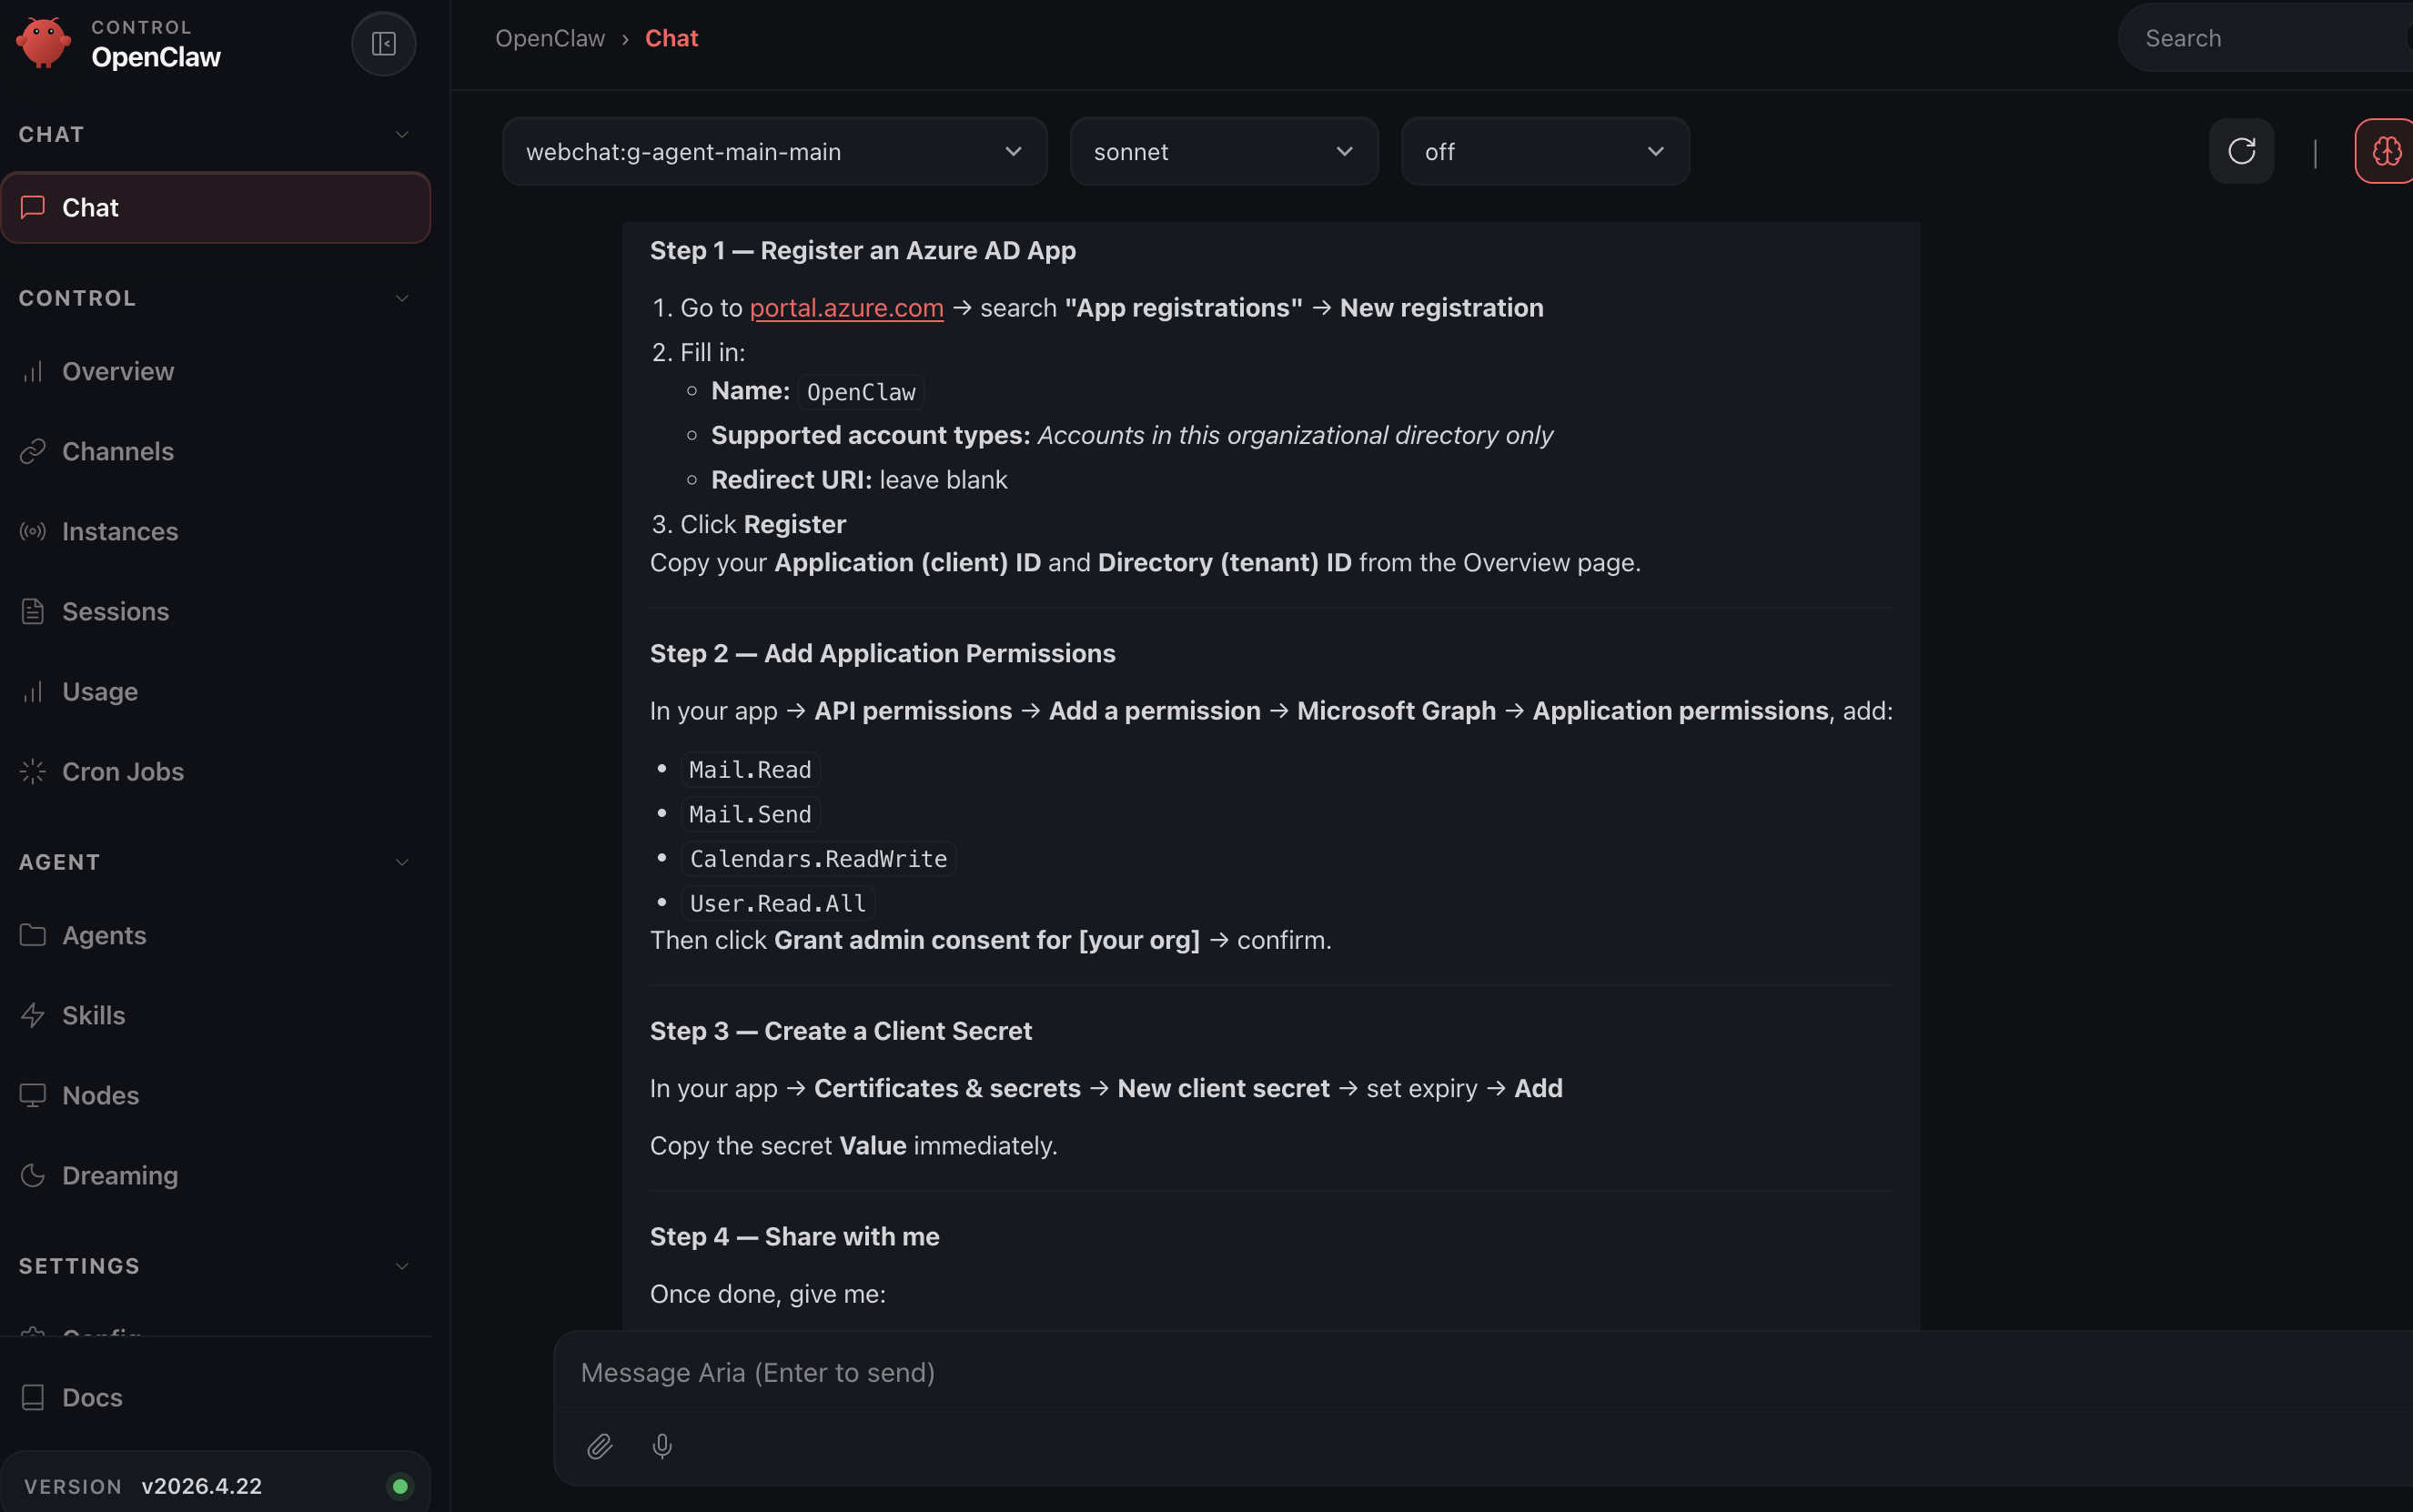
When adding Microsoft Graph permissions, always choose Application permissions (not Delegated). Application permissions allow OpenClaw to run as a background service without a user needing to stay logged in. Delegated permissions expire when the user session ends, your automation will break silently overnight and you won’t know why until the Monday reports don’t arrive.
Also: only grant permissions you actually need. Mail.Read is a very different risk level from Mail.ReadWrite. Start minimal and expand as required.
Usecase 1 — AI-Powered Career Mailbox Screening 📬
The Problem
Your careers@yourcompany.com inbox is a disaster. 80% is spam, automated sales pitches pretending to be candidates, and applications for roles you’re not hiring for. But buried in there are real people your team is missing because nobody has bandwidth to read 50 emails a day.
The Two-Stage Pipeline
Setting Up the Cron Job
Send this instruction to your Main Agent:
Set up a cron job that runs every 2 hours to:
1. Check careers@ourcompany.com for unread emails
2. For each unread email: classify as Applicant, Spam, or Other
3. If Applicant: send the full email content + any CV attachment
   to the Expert agent for evaluation
4. Expert agent returns: candidate name, applied role, fit score
   1-10, key strengths, red flags, recommended next step
5. Email me the summary, CC the HR Manager. Also send me a Telegram summary
6. Mark all processed emails as read
Once a promising candidate is flagged, respond directly on Telegram:
Send [Candidate Name] an email thanking them for applying and
proposing a 30-min video call next Tuesday or Wednesday afternoon.
Cc hr@ourcompany.com.
Depending on the model you are using for your Expert agent, you may get some qualified email like the following:
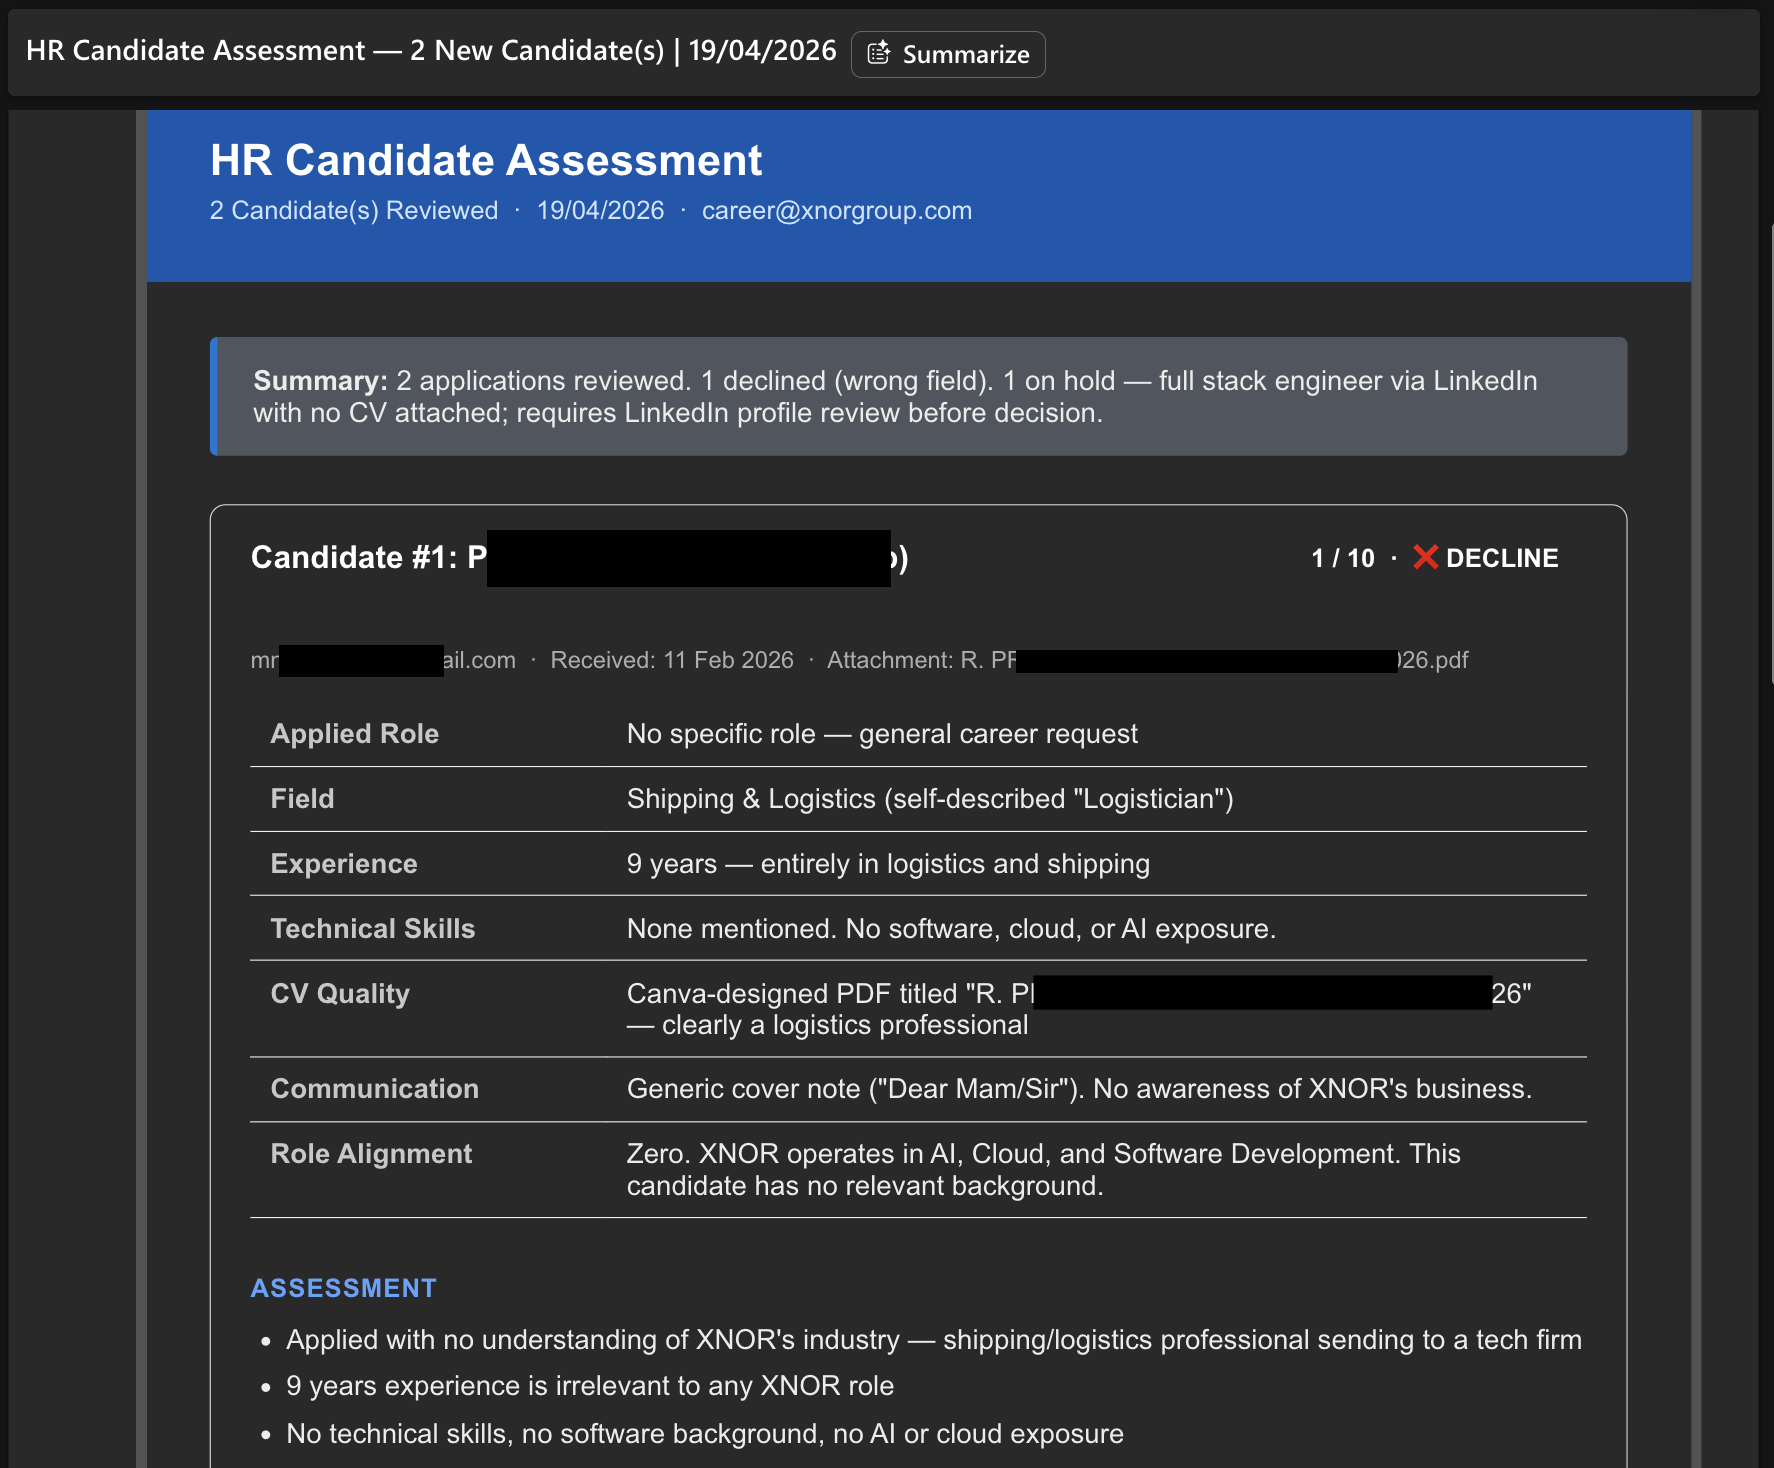
The quality of your inbox screening depends on how precisely you define “Applicant” vs “Spam” in the Main agent’s instructions. Write something like: “An applicant email is one where a human is applying for a job role, includes a CV or work history, and references a specific position or team. Automated application system notifications, LinkedIn alerts, and sales emails are Spam.”
Vague rules = the Expert agent gets called on junk. Precise rules = expert agent only touches real candidates = significant cost savings.
Usecase 2 — Automated Weekly Meeting Briefing for the CEO 📊
The Problem
Weekly department meetings are critical, but the prep work is brutal: sending reminders, chasing pre-reads, collecting reports, synthesizing everything into something a busy CEO can act on in 10 minutes. Classic high-volume, multi-step workflow. Perfect OpenClaw territory.
The Automated Workflow
Create two recurring scheduled tasks:

TASK 1 — Every Monday at 7:00 AM:
- Read the "Weekly Leadership Meeting" event from the company calendar
- Send a reminder email to each department head:
  (eng@, product@, marketing@, ops@, finance@)
- Include agenda template with sections: KPIs vs targets, top 3
  wins, top 3 blockers, resource needs, cross-team dependencies
- Ask them to reply with their report by Friday 5:00 PM

TASK 2 — Every Friday at 5:30 PM:
- Collect all email replies to this week's Monday reminder
- Send all reports to expert agent with this instruction:
  "Produce a CEO executive summary with:
   1. Overall business health (1 paragraph)
   2. Department highlights (max 3 bullets per dept)
   3. Cross-department issues needing CEO attention
   4. Top 3 risks this week
   5. Recommended CEO focus for next week"
- Send the result to me on Telegram by Saturday 8:00 AM
Enhance Task 1 by adding: “If by Friday 4:00 PM a department head has not replied, send them one polite automated reminder.” The agent does this without emotion, consistently, every week; no awkward chasing by the CEO or EA.
Also tell the Expert agent to flag anything requiring an explicit CEO decision with a 🔴 tag. This makes the Saturday briefing immediately actionable, not just informational. The CEO opens it and knows exactly what requires their attention before the first sip of coffee.
These two usecases are just the beginning. The same pattern. Main agent handles volume, delegates complexity, Expert agent reasons, you get a clean summary, applies everywhere:
- Daily sales pipeline digest from your CRM
- Customer support ticket triage and escalation
- Competitive intelligence monitoring via web search agents
- Board meeting packet preparation from multiple department inputs
- New hire onboarding workflow automation
Don’t forget whenever you finish with the workflow setup, you can just ask the agent itself to change to a lighter model (such as Claude Haiku 4.5) to save your tokens.
You’re Now Ahead of 99% of Companies Running AI 🦞
Here’s the thing about OpenClaw: it’s not just a productivity tool. It’s a signal of where business operations are heading. The companies that learn to design systems of AI agents, rather than just use AI as a fancy search box, will operate at a fundamentally different speed than those that don’t.
You’ve built something that runs 24/7 in the cloud, is locked down behind a private VPN, uses Docker for clean isolation, controls AI costs with intelligent model selection, and automates two real workflows that used to eat genuine human hours every week.
- Run
openclaw doctorperiodically to catch misconfigurations early - Keep your Docker image current:
docker compose pull && docker compose up -d - Rotate your Tailscale auth key every 90 days (set a reminder right now)
- Review Azure AD API permissions every 6 months, remove what you’re not using
- Monitor your AI provider billing weekly for the first month to establish a cost baseline
Questions, corrections, or war stories from your own setup? Drop a message. The more we share, the better everyone’s lobsters get. 🦞


